
Lost Lands 9 Chapter Academic Interest Walkthrough
After gaining some puzzle-solving skills, we move on to the second chapter - "Academic Interest". Now a student of Tonvild magic academy - Maaron, a pupil of the sorceress Cassandra, gets involved. As a practical task, he is assigned to find and capture an unknown beast that is tormenting the inhabitants of the neighbourhood.
- Chapter 1: Unchildlike mischief
- Chapter 2: Academic interest
- Chapter 3: First Brotherhood
Here is the complete walkthrough for the 2nd chapter in the game Lost Lands 9. We have collected detailed description for passing puzzles and step-by-step guide for finding hidden items.

✔ Pick up the CRYPTEX in the lion statue's mouth (A)
✔ Click on the CRYPTEX, solve the puzzle and get the PERSONAL SIGNET
✔ Lean the PERSONAL SIGNET against the entrance door of the academy (B)
✔ Enter the door that opens

✔ Click on the corridor in the centre (C)
✔ Take the CANDLES on the right 1/4 (D)
✔ Pick up the CANDLES in the hallway near the bench 2/4 (E)
✔ Take the CANDLES from the candlestick on the right 3/4 (F)
✔ Take the CANDLES from the candlestick on the left 4/4 (G)
✔ Press twice on the corridor in the centre (C)
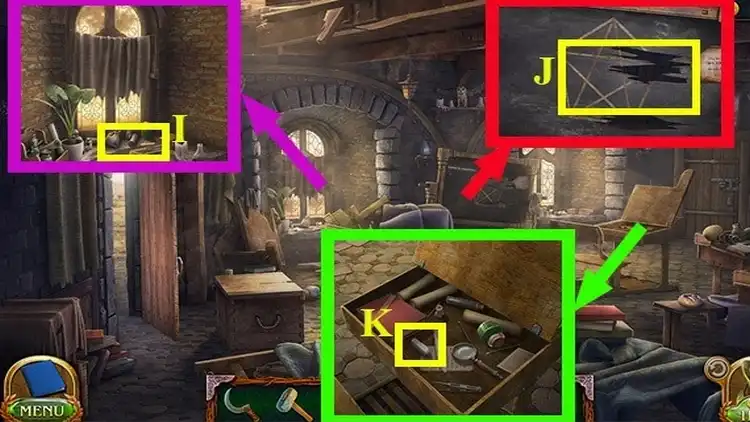
✔ Place the CANDLES in the empty candlesticks (I)
✔ Click on the puzzle on the door and solve it
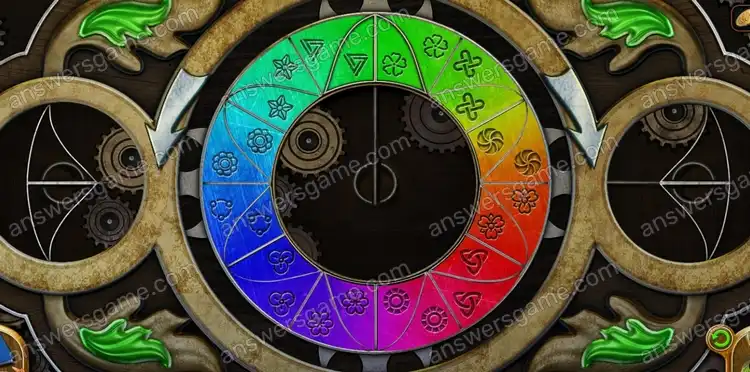
✔ Puzzle walkthrough:
Rotate the circle and match the identical elements
Focus on the colour of the elements
✔ Enter the open door
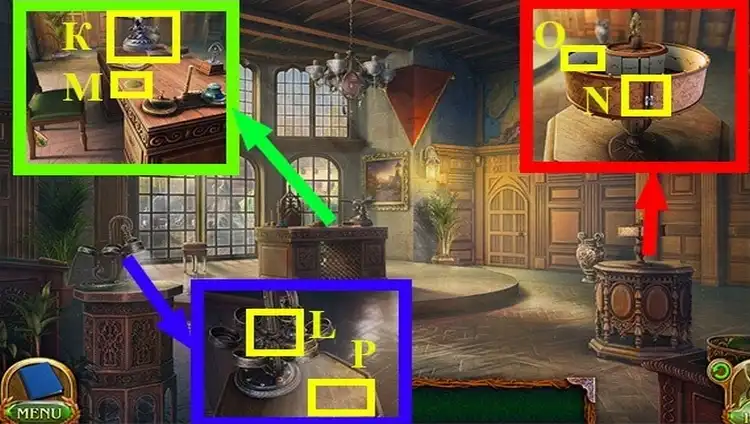
✔ Press the bird statue on the table (K)
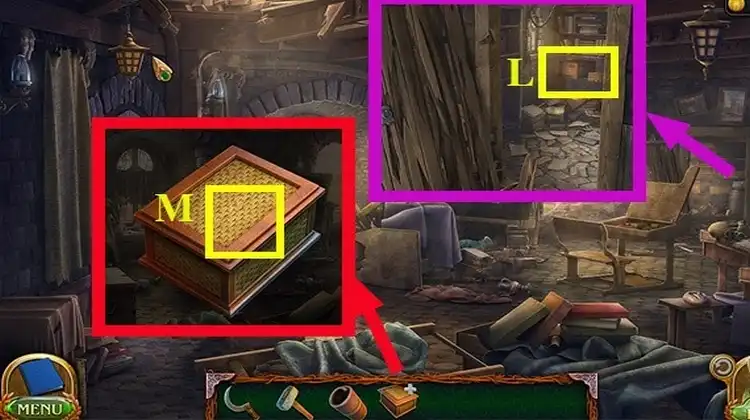
✔ Press the device on the left (L)
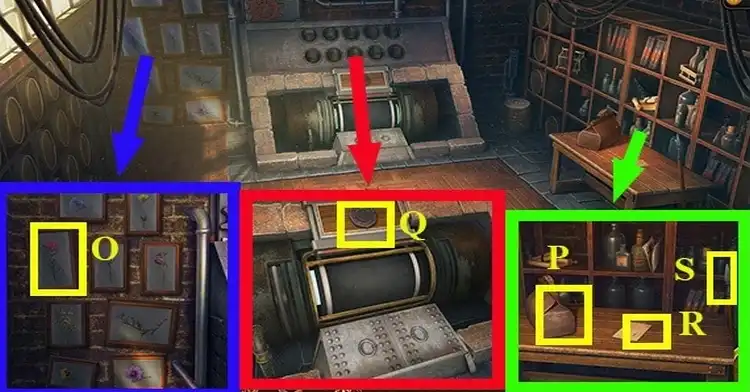
✔ Pick up the YELLOW LIGHT FILTER (M) on the table
✔ Press twice on the device on the right (N) and pick up the RED LIGHT FILTER
✔ Click on the bird image (O) and get ANIMATION TAPE
✔ Place the RED LIGHT FILTER and the YELLOW LIGHT FILTER in the device on the left (L)
✔ Place the ANIMATION TAPE next to it (P)
❗ Not enough filters
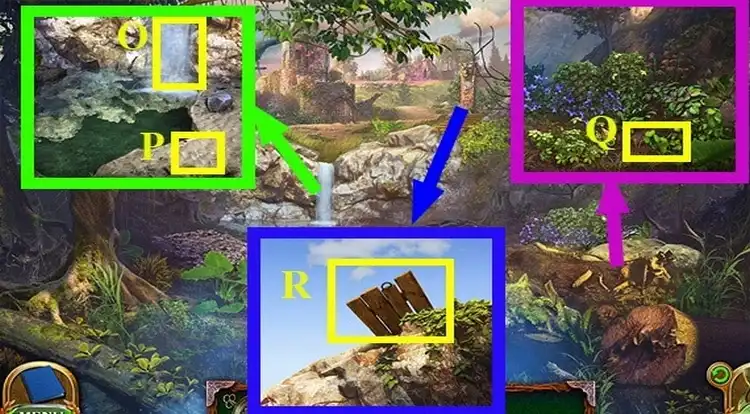
✔ Go out into the hall
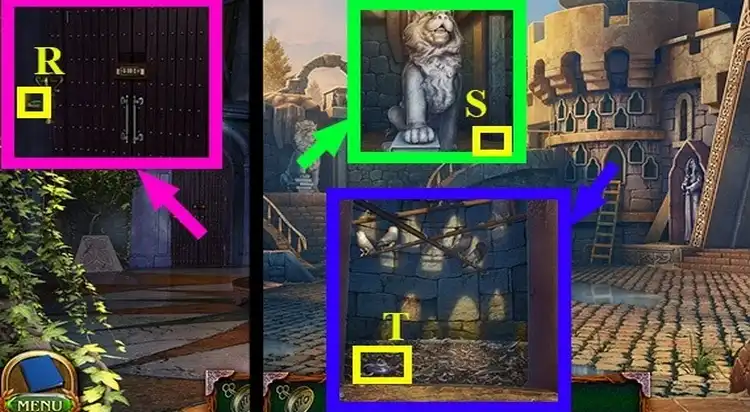
✔ Pick up the GREEN LIGHT FILTER on the candlestick on the left (R)
✔ Exit the academy
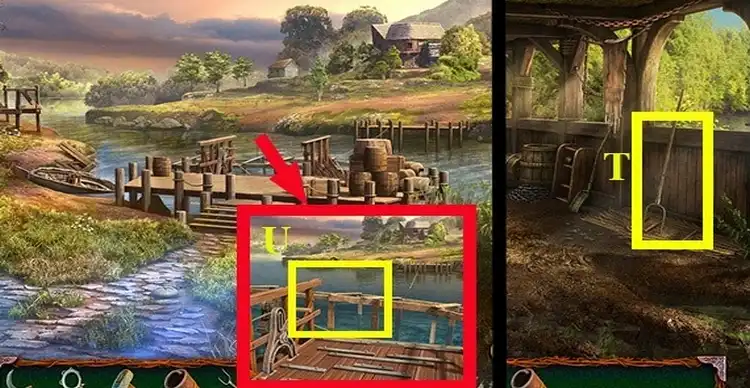
✔ Take the BLUE LIGHT FILTER next to the lion statue (S).
✔ Take the VIOLET LIGHT FILTER in the window with the ladder (T).
✔ Go back to the device
✔ Install the GREEN LIGHT FILTER, BLUE LIGHT FILTER and VIOLET LIGHT FILTER.
✔ Pick up the INKWELL on the table.
✔ Place the INKWELL near the device on the left side of the table
✔ Go outside
✔ Take the OWL'S FEATHER from the window with the ladder.
✔ Return to the room
✔ Pick up the STATIONERY BLADE on the table.
✔ Use the STATIONERY BLADE with OWL'S FEATHER and get QUILL
✔ Dip the QUILL into the inkwell (G)
✔ Press the inkwell (G), then press the device (H). Do this for each LIGHT FILTER
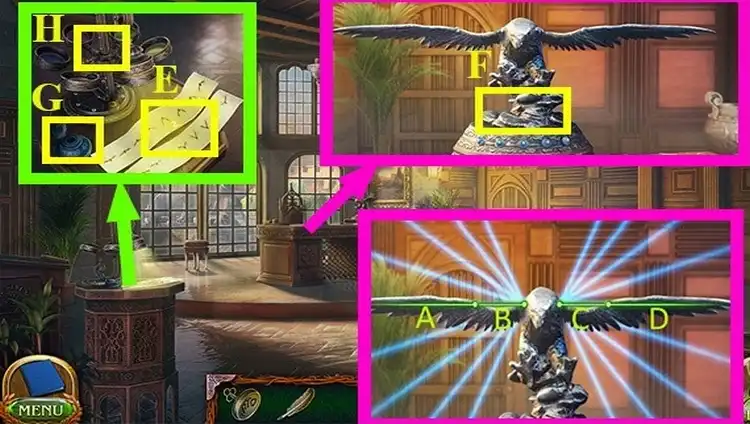
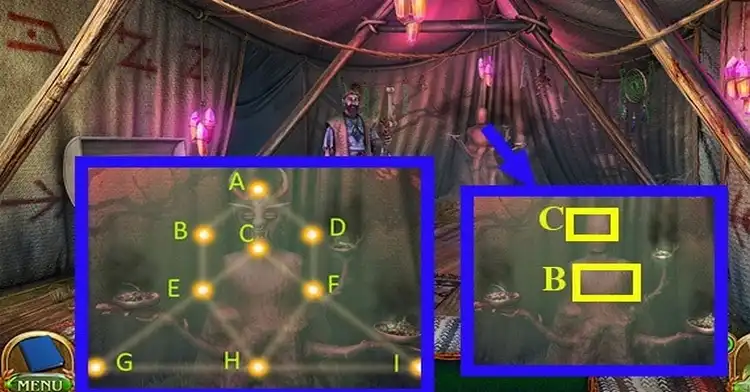
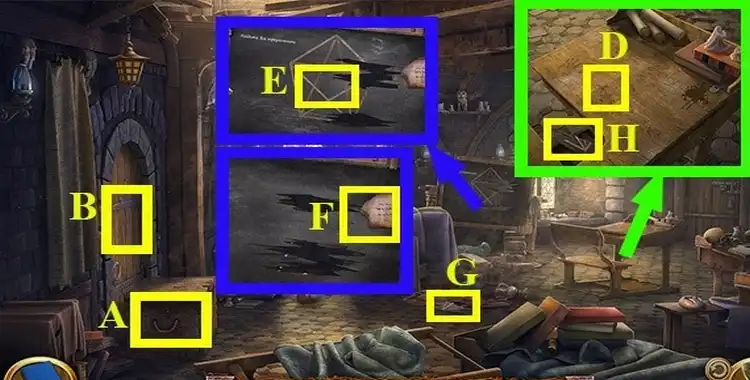
✔ Take the STORYBOARD (E)
✔ Put the STORYBOARD next to the bird figurine on the table (F) and solve the puzzle
✔ Walkthrough the puzzle with the bird:
- Press 2 times on (B), 3 times on (A), 1 time on (D)
- Press 6 times on (B), 4 times on (C), 1 time on (D)
- Press 2 times on (B), 2 times on (A), 6 times on (C), 1 time on (D)
- Press 2 times on (B), 1 time on (A), 8 times on (C)
- Press 8 times on (B), 2 times on (D)
❗ Take your time, if you press too fast, the result does not count and the solution does not occur
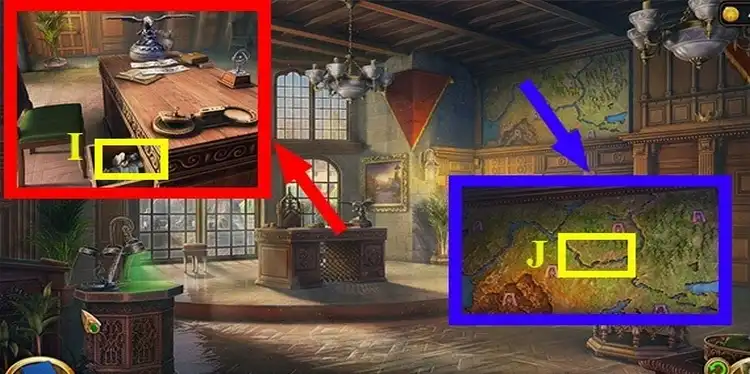
✔ Click on the desk drawer (I), take TRACING PAPER WITH SYMBOLS and LIBRARY KEY
✔ Apply TRACING PAPER WITH SYMBOLS to the map on the wall on the right (J)
✔ Go back to the hall
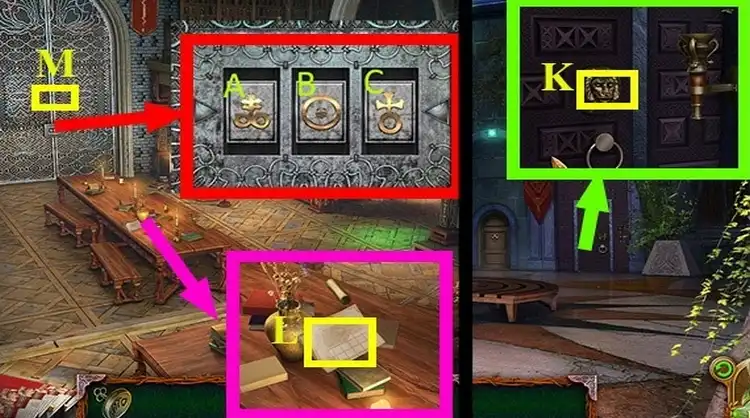
✔ Use the LIBRARY KEY to open the door on the right (K)
✔ Go through the open door
✔ Click twice on the manuscript (L) and memorise the clues on the table and wall
✔ There is a code lock on the metal door, solve the code
✔ Solution: C, B, A, A
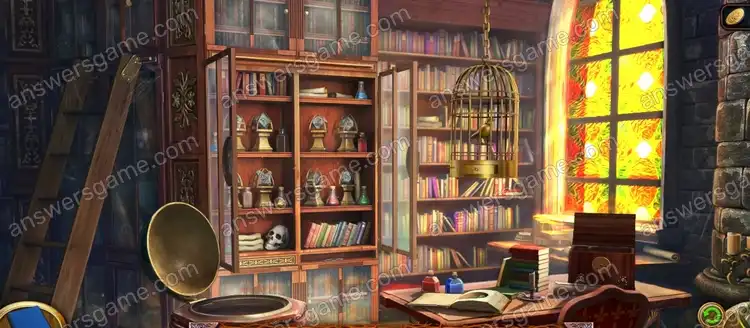
✔ Go through the open door (M), find the hidden objects and get RUNESTONE
✔ There is a MOP on the left under the stairs
✔ On the top shelf is CONTINENT, use MOP to take it off
✔ Place CONTINENT on the globe, take ENVELOPE KNIFE and BALL OF THREAD
✔ Give the BALL OF THREAD to the cat to make it run away
✔ Pick up the DOOR HANDLE on the table
✔ Click on the cupboard where the cat was sitting and put the DOOR HANDLE in its place
✔ Take the ELEMENT OF THE COMBINATION LOCK from the cupboard
✔ Place the ELEMENT OF THE COMBINATION LOCK in the box on the table
✔ Solve the small feather puzzle on the box
✔ Pick up the METAL FEATHER
✔ Take the ENVELOPE KNIFE and use it to pry up the board on the cupboard (between the bottom and middle compartment of the cupboard)
✔ Take the KEY from there
✔ Use the KEY to open the drawer on the cage with the iron bird
✔ Take the CRYSTAL STAR from there
✔ Click on the book and place the CRYSTAL STAR in the appropriate place
✔ Light bulbs will glow on the book, memorise the sequence - this is the code
✔ Enter the code to open the book
✔ Take the GLASS EYE from the book
✔ Place GLASS EYE and METAL FEATHER on the bird on the cabinet
✔ Take RUNESTONE
✔ Go outside
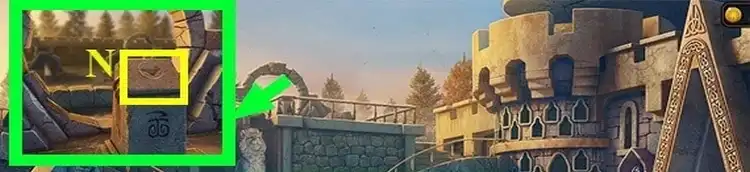
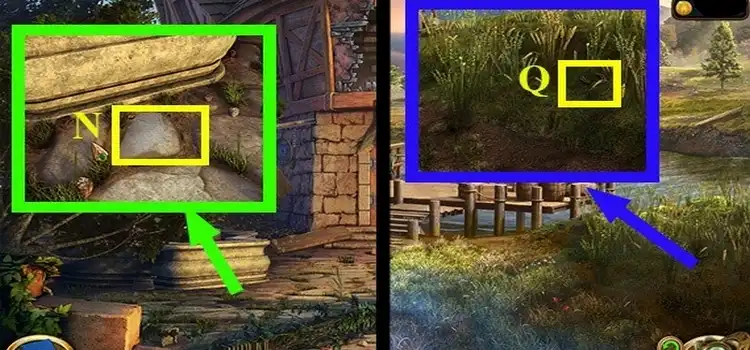
✔ Place RUNESTONE in the slot on the teleporter, above the lion (N)
✔ Solve the puzzle

❗ Everyone's solution to the puzzle is different, but there's a lifehack. Just pick the same pair of chips all the time
✔ Go to the teleporter
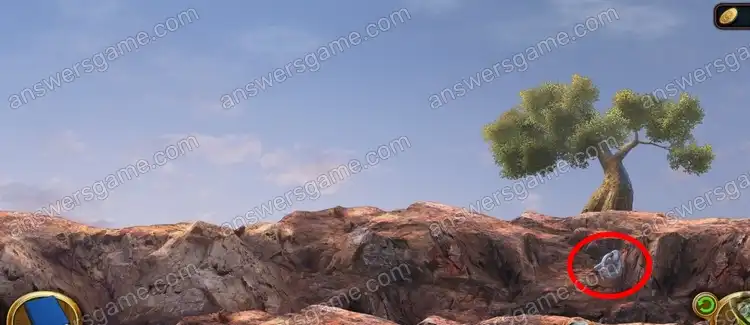
✔ Click on the flowers near the stones on the right and under the plant leaf get SICKLE (Q)
✔ Press the waterfall (O) and get SHAFT
✔ Press on the mud (P)
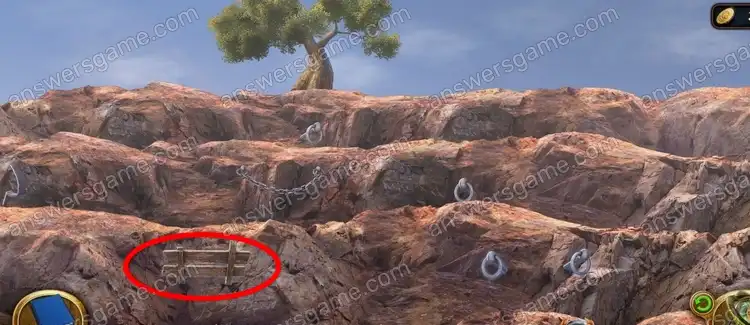
✔ Use the SHAFT from the shovel to pull out the ladder from the knocked down planks (R)
✔ Go to the obelisk
✔ Click on the puzzle image on the left and solve the puzzle
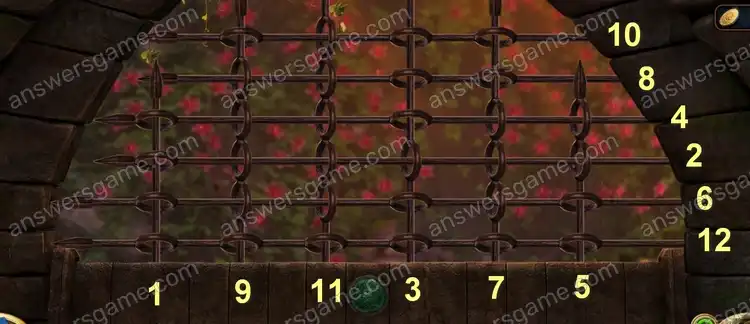
✔ Puzzle walkthrough:
Remove the bars one by one to open the gate
Press the bars one by one according to the numbering on the picture
✔ Click on the obelisk
✔ Go 2 times forwards (to the tent)
✔ Get the SPELL FORMULA
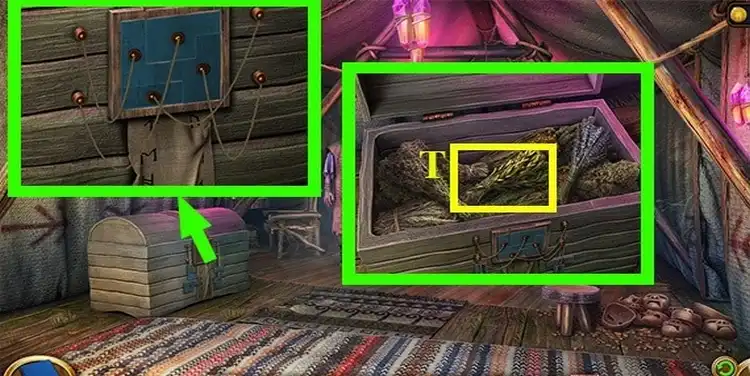
✔ Solve the puzzle on the chest
✔ Click on the chest and see what it contains (T)
✔ Exit the tent
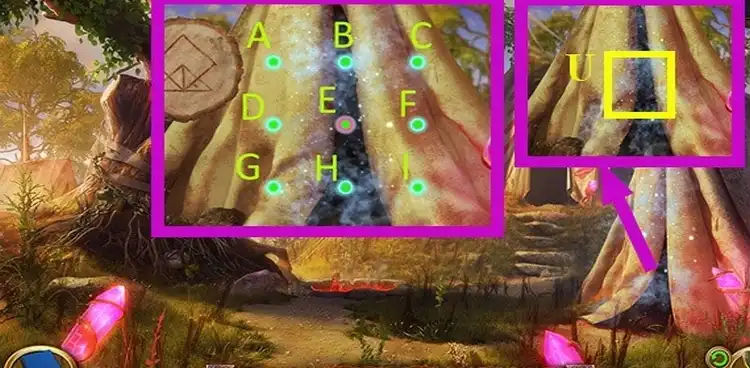
✔ Click on the tent on the right and use the SPELL FORMULA (U)
✔ Solve the puzzle
✔ Complete the puzzle: H, D, B, F, H, G, E, I, H, E
✔ Enter the tent on the right
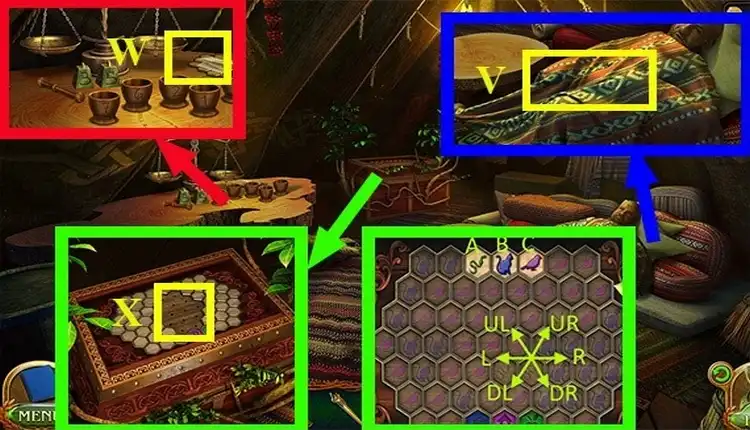
✔ Press the man (V)
✔ Pick up the OINTMENT RECIPE and PIECE OF THE PUZZLE on the table (W)
✔ Place the PIECE OF THE PUZZLE on the chest (X) and solve the puzzle to get the CHAIN KEY and BANDAGE
✔ The puzzle is randomly generated. Everyone's walkthrough is different
✔ Exit the tent
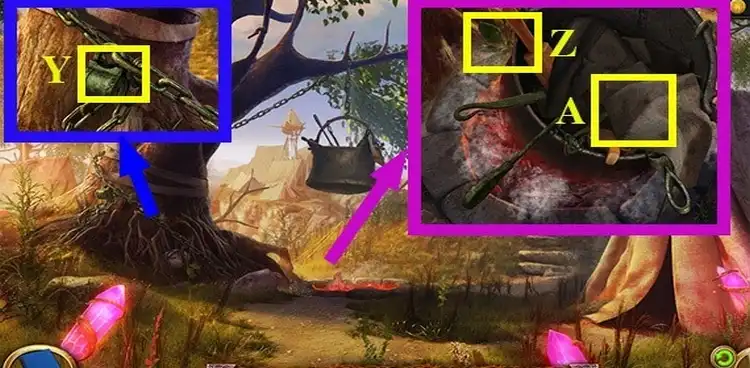
✔ Use CHAIN KEY on the tree (Y)
✔ Pick up LEAVES OF HEALER'S TONGUE near the roots of the tree
✔ Pick up the LEAVES OF HEALER'S TONGUE near the fallen pot (Z)
✔ Press twice on the cauldron (A) to get FLASK and BOWL
✔ Go back

✔ Use FLASK on the right obelisk (B) and get TEARS OF THE IDOL
✔ Pick up LEAVES OF HEALER'S TONGUE at the foot (C).
✔ Take the FIREFLY IVY FLOWERS on the left in the archway (D)
✔ Go back
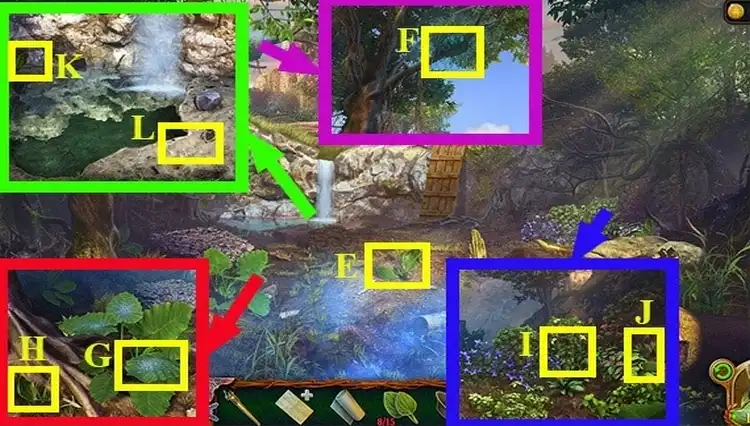
✔ Pick up LEAVES OF HEALER'S TONGUE in the centre of the location (E)
✔ Pick up LEAVES OF HEALER'S TONGUE near the roots of the tree on the left (H).
✔ Pick up the LEAVES OF HEALER'S TONGUE in the flowers on the right (J)
✔ Click on the waterfall and take the LEAVES OF HEALER'S TONGUE on the left (K).
✔ Take the SHAFT and knock on the nest on the tree (F)
✔ Collect the FOREST FAIRY POLLEN from the leaves (G)
✔ Take the STEM OF BEETLE MILK from the flowers on the right (I)
✔ Take the BOWL and scoop up the sand near the waterfall (L) to get SILT.
✔ Go back to the tent (2 times forwards, then to the right)
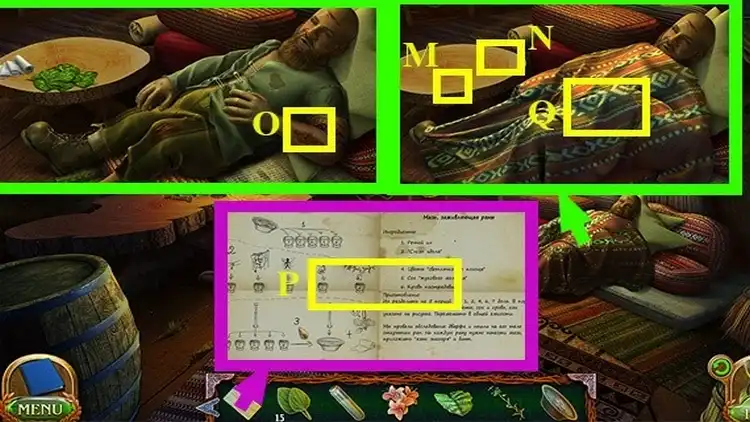
✔ Place LEAVES OF HEALER'S TONGUE and BANDAGE on the table beside the patient (M)
✔ Remove the bedspread (Q)
✔ Place the SICKLE on the arm (O) and get the BLOOD OF THE VICTIM
✔ Open the recipe and put the following ingredients on it to get SET OF INGREDIENTS:
- SILT
- TEARS OF THE IDOL
- FOREST FAIRY POLLEN
- FIREFLY IVY FLOWERS
- STEM OF BEETLE MILK
- BLOOD OF THE VICTIM
✔ Go back
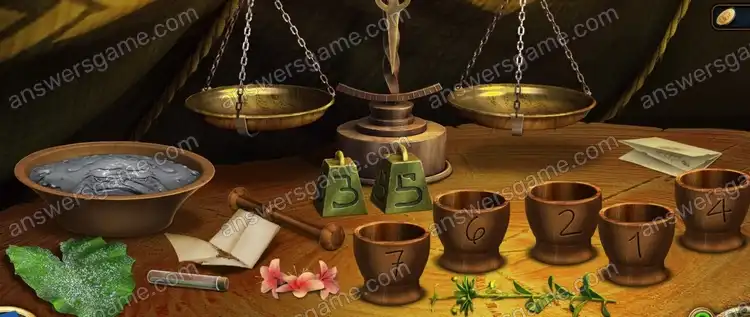
✔ Press the scales and place the SET OF INGREDIENTS on the table
✔ Solve the puzzle, measure the sludge into cups
⚖ Solution 1:
- Put weight 5 on the left-hand side of the scale
- Place weight 3 on the right-hand side of the scale
- Put cup 2 on the right side of the scale
- Put SILT in cup 2
- Remove everything from the scale
⚖ Solution 2:
- Place weight 5 on the left-hand side of the scale
- Place cup 2 on the left-hand scale
- Place cup 7 on the right-hand scale
- Put SILT in cup 7
⚖ Solution 3:
- Place cup 7 on the left-hand side of the scale
- Place weight 3 on the right-hand scale
- Place cup 4 on the right-hand side of the scale
- Put SILT in cup 4
⚖ Solution 4:
- Place cup 2 on the left-hand side of the scale
- Place cup 4 on the left-hand scale
- Place cup 6 on the right-hand scale
- Put SILT in cup 6
⚖ Solution 5:
- Place cup 7 on the left-hand side of the scale
- Place cup 6 on the right side of the scale.
- Place cup 1 on the right-hand side of the scale.
- Put sludge in cup 1

✔ Add FOREST FAIRY POLLEN (A) to cup 2
✔ Add FIREFLY IVY FLOWERS (D) to cup 1
✔ Add TEARS OF THE IDOL (B) to cup 6
✔ Add BEETLE MILK JUICE (E) to cup 4
✔ Add BLOOD OF THE VICTIM (C) to cup 7
✔ Stir the contents of the cups with a mortar (F)
✔ Press the cups to pour the contents into the bowl
✔ Stir the mortar (F) into the bowl (G)
✔ Pick up the OINTMENT (G)
✔ Place the OINTMENT on the table
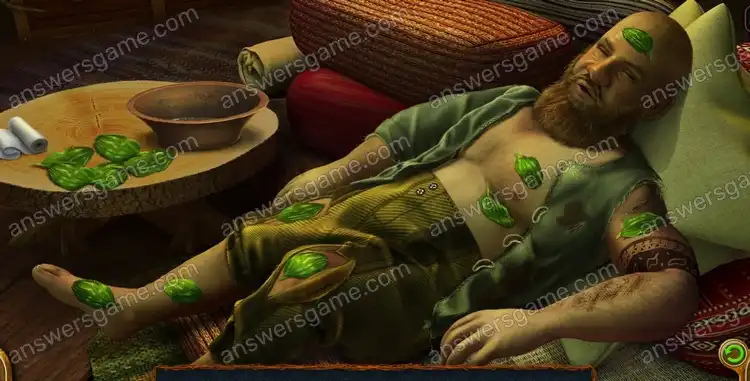
✔ Remove the blanket
✔ Open all the wounded areas and apply ointment. There are more wounds on the back and neck.
✔ Go back to the library
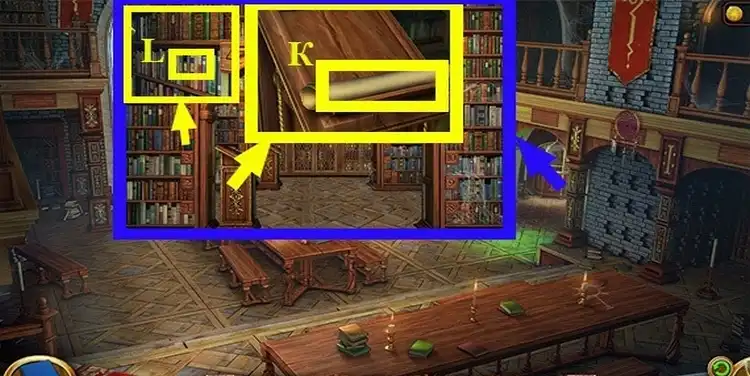
✔ Click on the arch on the right
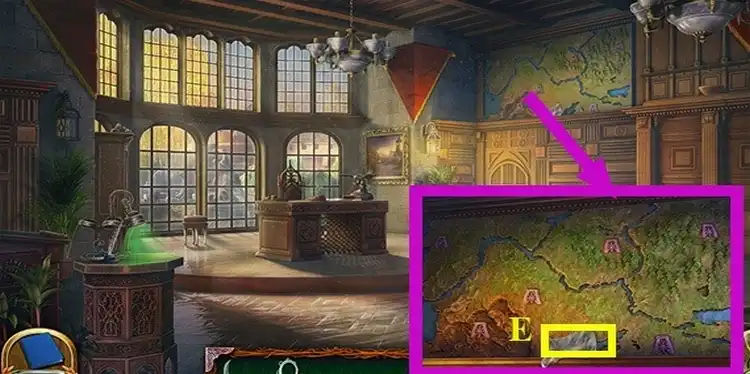
✔ Click on the roll in the centre (K) and remember what the sign for the "Spells" section looks like
✔ Go to the desired section and click on the roll to find out the number of the shelf of books
✔ Click on the 4th shelf and select a book.
✔ Go back 2 times
✔ Pick up the DRY CHAMOMILE (M) on the table.
✔ Go to the lobby of the academy
✔ Press the code lock on the door on the left (N) and solve the puzzle
✔ Solution: A, A, A, B, C, C, D, D, D
✔ Enter the door
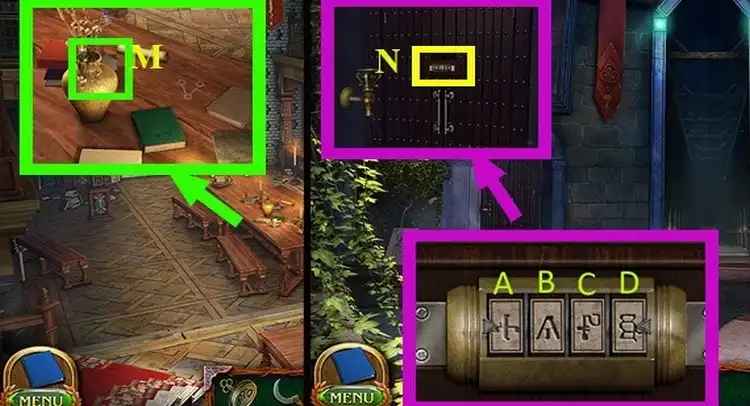
✔ Use PERSONAL SIGNET to open the generator (Q)
✔ Click on the paintings and take DRY ROSE (O)
✔ Click on the bag (P)
✔ Click on the instructions (R) to solve the puzzle.
✔ Connect the dots according to the pictures in the instructions. In most cases, the pattern of two letters PP will fit.
✔ Press the spear (S) to check the depth of the bag.
✔ Take the BOTTOMLESS BAG (P).
✔ Walk backwards 2 times, then forwards 3 times (to the tents)
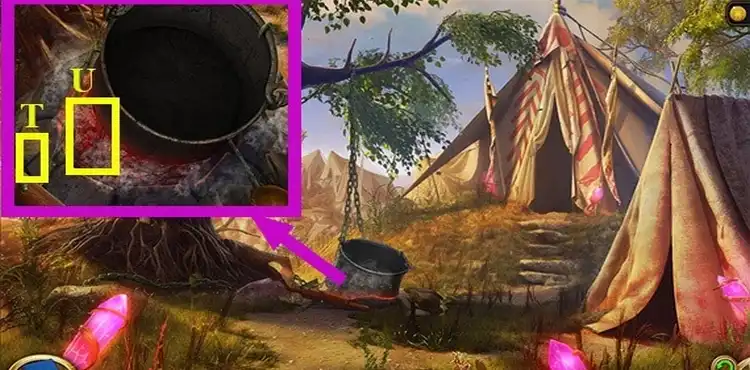
✔ Drag the trowel (T) over the coals (U) to get HOT COALS
✔ Go straight ahead
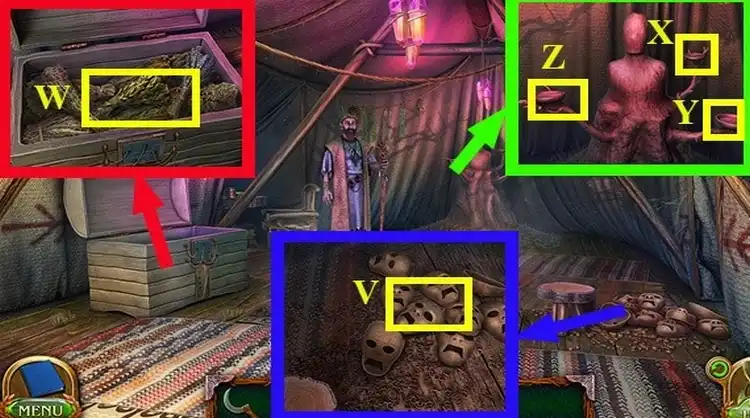
✔ Put the masks in the BOTTOMLESS BAG (V) to get BLANK MASKS
✔ Take the DRY MINT in the chest (W)
✔ Put DRY MINT in the bowl by the statue (X)
✔ Put DRY ROSE in the bowl by the statue (Z)
✔ Put DRY CHAMOMILE in the bowl by the statue (Y)
✔ Then put HOT COALS (Y) in the bowl
✔ Go back to the academy hall and enter the left door
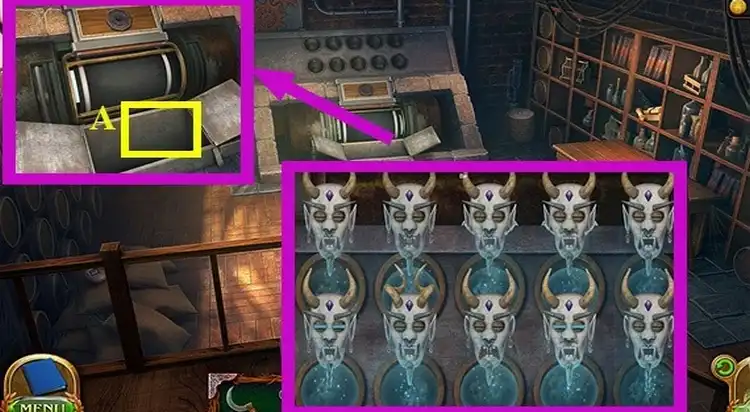
✔ Put BLANK MASKS in the generator (A), solve the puzzle and get RITUAL MASK
✔ Solution:
- Choose a mask that has unique horns
- Choose a mask that has a unique smile
- Choose a mask that has unique teeth
- Choose a mask that has unique ears
- Choose a mask with a unique beard
- Choose a mask with unique eyes
- Choose a mask that has a unique nose earring
- Choose a mask that has a unique earring in its ear
✔ Return to the tent
✔ Put the RITUAL MASK on the statue (B) and solve the puzzle
✔ Walkthrough: A, B, E, G, H, E, C, F, H, I, F, D, A, C
✔ Click on the mask (C) and take the TALKING MASK.
✔ Go into the neighbouring tent

✔ Put the TALKING MASK (D) on the victim and get the SCHOOL KEY
✔ Go backwards 4 times, then to the right and forwards
✔ Press the tracing paper (E)
✔ Go backwards, then to the right

✔ Pick up the RUNESTONE on the shelf (F)
✔ Go outside
✔ Place RUNESTONE in the portal on the left (G) and solve the puzzle
✔ Solution to the puzzle:
A) RIGHT, TOP, LEFT, DOWN, LEFT, TOP, LEFT, TOP, LEFT, DOWN, RIGHT, DOWN, RIGHT, DOWN, LEFT, TOP, LEFT, TOP, RIGHT, TOP, LEFT, TOP
B) DOWN, LEFT, TOP, RIGHT, TOP, RIGHT, DOWN, RIGHT, TOP, RIGHT, TOP, RIGHT, DOWN, LEFT, TOP, LEFT, TOP, RIGHT
C) TOP, LEFT, DOWN, LEFT, TOP, LEFT, TOP, LEFT, DOWN, RIGHT, DOWN, LEFT, DOWN, LEFT, TOP, LEFT, DOWN, RIGHT
✔ Go to the left teleporter

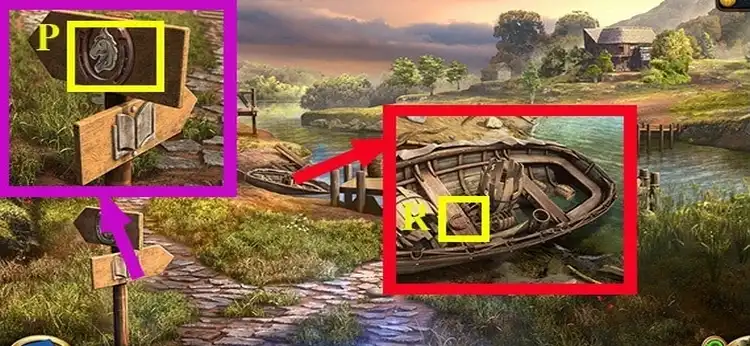
✔ Click on the boat (H)
✔ Use SICKLE to cut the ropes (H)
✔ Enter the stable on the left
✔ Press the feeder (I)
✔ Pick up the HAMMER by the crate (J)
✔ Open the desk drawer (K)
✔ Go to the boat
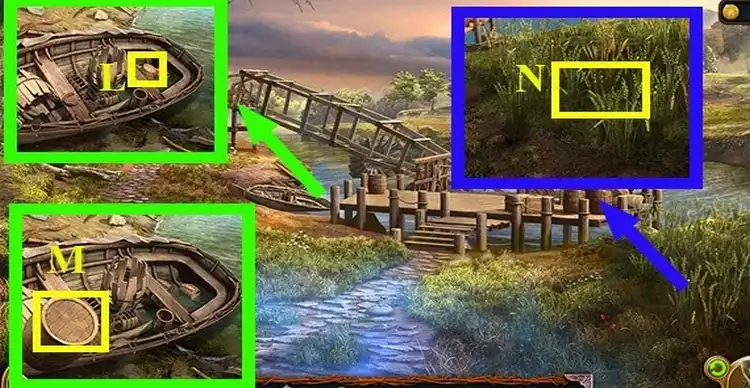
✔ Press the barrel (L)
✔ Break the lid of the barrel with the HAMMER (M) to get WATER
✔ Click on the grass on the right and use the SICKLE (N) to get OATS
✔ Go back to the stables
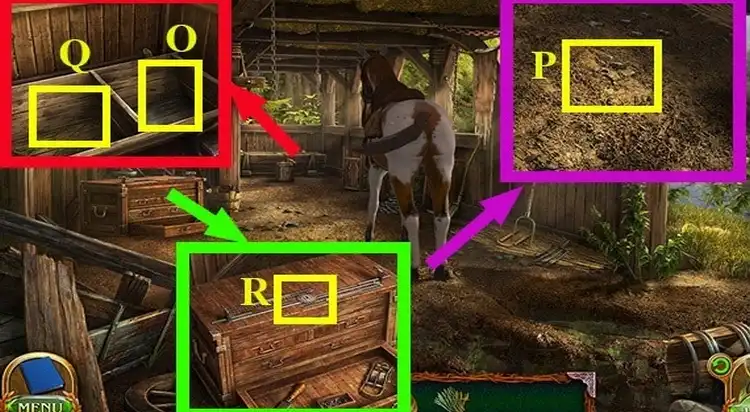
✔ Pour WATER into the feeder (O)
✔ Put OATS in the feeder (Q)
✔ Pick up the KEY at the place where the horse was standing
✔ Use the KEY to open the drawer (R) and take the SET OF TOOLS.
✔ Go back
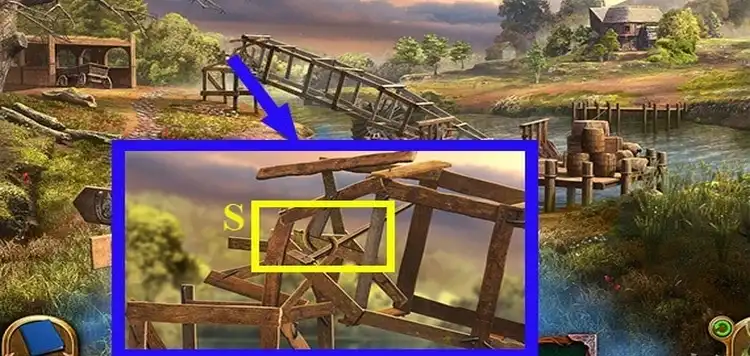
✔ Use SET OF TOOLS to unhook the windmill (S)
✔ Solve the puzzle
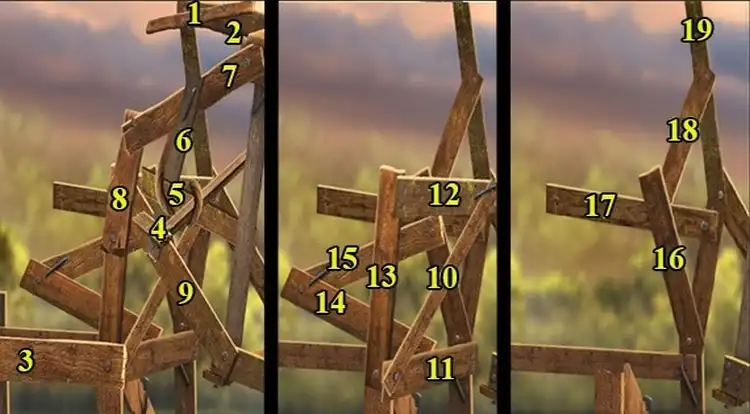
✔ Solution: 1, 2, 3, 4, 5, 6, 7, 8, 9, 10, 11, 12, 13, 14, 15, 16, 17, 18, 19
✔ Go to the stables
✔ Pick up the PITCHFORK (T)
✔ Push the structure with the PITCHFORK (U)
✔ Walk forwards

✔ Use the SCHOOL KEY to open the door (V)
✔ Click on the door (X)
✔ Click on the door in the shed on the right (Y) and collect BOXES
✔ Click on the hole in the wall
✔ Go down
✔ Pull back the box on the left (A)
✔ Press the door (B)
✔ Press the desk (D)
✔ Press the blackboard (E)
✔ Press the piece of paper (F)
✔ Pick up the PIECE OF BOARD on the floor (G)
✔ Pick up the PIECE OF BOARD under the table (H)
✔ Pick up the PIECE OF BOARD by the window (I)
✔ Use 3 PIECE OF BOARD to repair the blackboard (J)
✔ Pick up the CHALK in the desk drawer (K)
✔ Use the CHALK on the blackboard (J), solve the puzzle and get the HINT
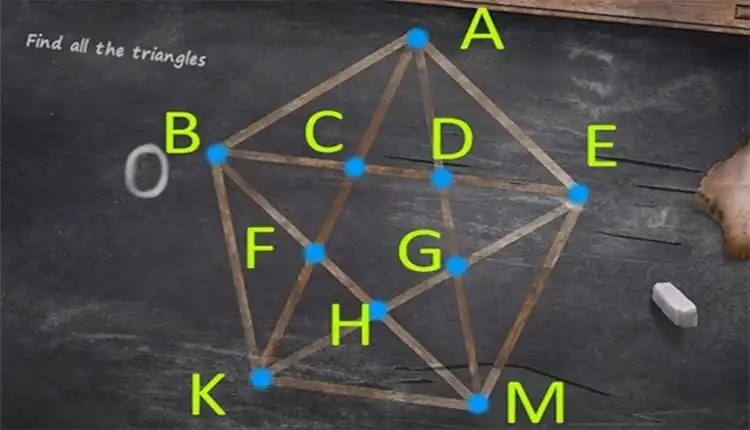
✔ Solving the puzzle on the blackboard, connect the following dots:
B-A-C, A-D-E, M-G-E, K-H-M, B-F-K, A-C-D, G-D-E, H-G-M, K-F-H, F-B-C, B-A-E, B-E-H, B-M-K, K-E-M, B-A-M, A-E-K, M-E-B, K-A-M, K-B-E, K-B-A, A-E-M, K-A-G, B-A-D, D-E-M, K-G-M, B-C-K, F-B-A, C-A-E, M-H-E, K-F-M, E-G-A, B-H-K, M-B-D, K-C-E, F-A-M
✔ Click on the door on the right and solve the code lock puzzle
✔ The code for the lock is the number of triangles on the blackboard - 035
✔ Press the door on the right and take the CASKET (L)
✔ Open the CASKET, remove the extra items and get the HINT
✔ Go to the left door
✔ Click on the stone near the fountain (N) and take HORSESHOE
✔ Go backwards
✔ Pick up HORSESHOE in the grass on the right (Q)
✔ Press the direction indicator and use SET OF TOOLS (P) to unscrew the HORSESHOE
✔ Take the last HORSESHOE from the boat
✔ Go to the stables
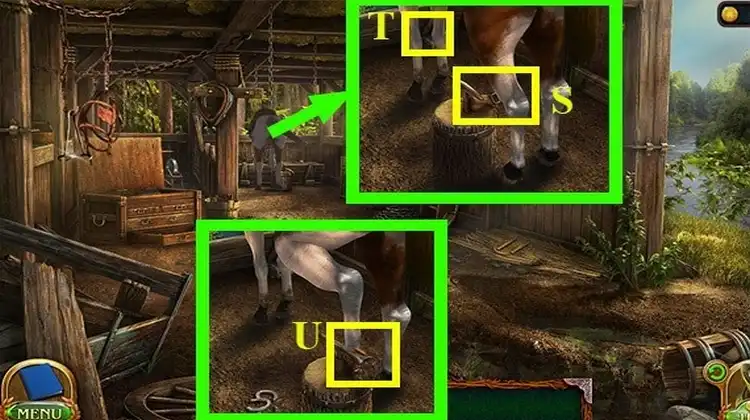
✔ Try to put HORSESHOE on the horse's legs (S)
✔ Use SICKLE to clean the hooves (U)
✔ Take the NAILS from the toolbox
✔ Use NAILS, HAMMER and HORSESHOE to shoe the horse
✔ Go backwards, then to the right, then forwards
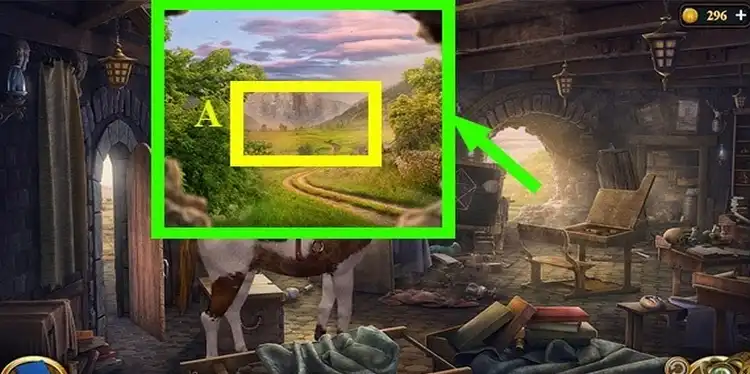
✔ Ride your horse through the archway (A)
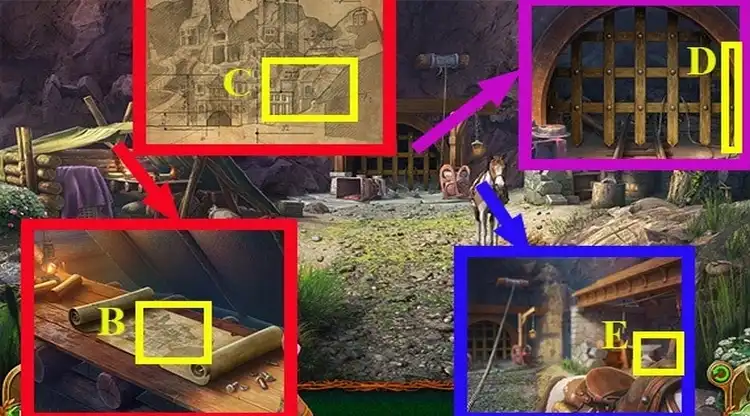
✔ Click on the roll on the left under the canopy (B)
✔ Click on the roll again (C) and take CLIMBER'S REMINDER
✔ Take the END OF THE ROPE on the grate (D)
✔ Try tying END OF THE ROPE to the horse's saddle (E)
✔ Place the END OF THE ROPE on the anvil (F)
✔ Drag the metal corner (G) onto the anvil (F)
✔ Use the HAMMER to flatten the metal corner
✔ Pick up the BOLT AND NUT on the table under the canopy (H)
✔ Place the BOLT AND NUT on the flattened corner (I)
✔ Use SET OF TOOLS to tighten the nut (I) and get ROPE LOOP
✔ Put the ROPE LOOP on the horse's saddle (J)
✔ Go to the tunnel (K)
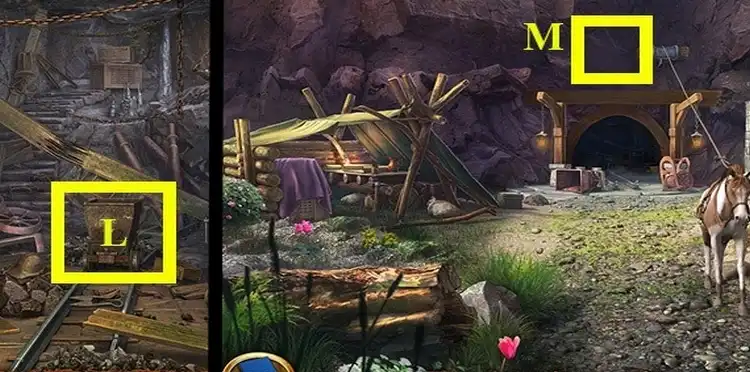
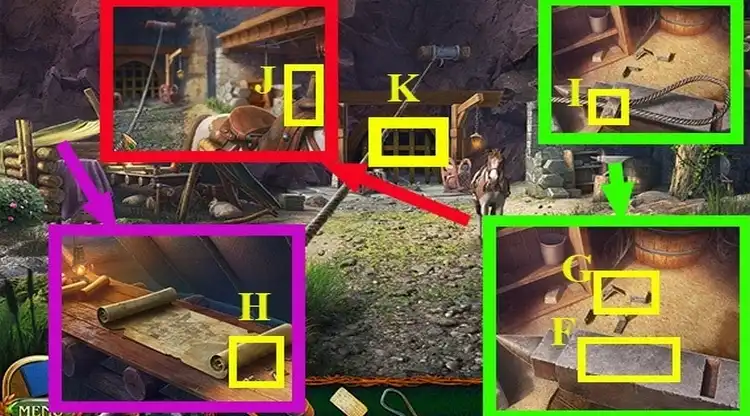
✔ Place CLIMBER'S REMINDER on the carriage (L)
✔ Collect the hidden items
✔ Solve the puzzle on the table
✔ Puzzle walkthrough:
The puzzle pieces are in random order for different players, so it is impossible to give a general solution. See the picture for the pattern you need to assemble
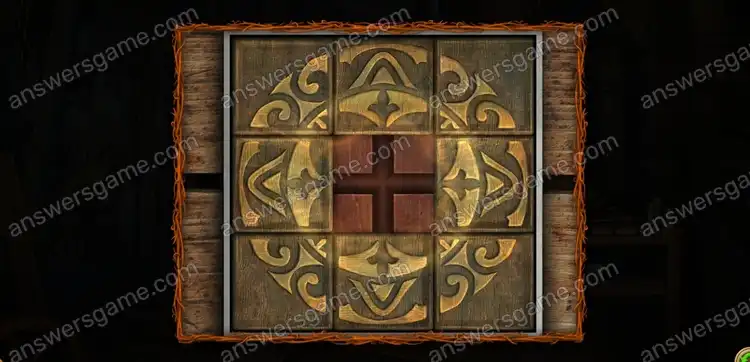
✔ Get CLIMBER EQUIPMENT
✔ Use the CLIMBER EQUIPMENT on the rock (M) and solve the puzzle
✔ Walk through the puzzle on the rock:
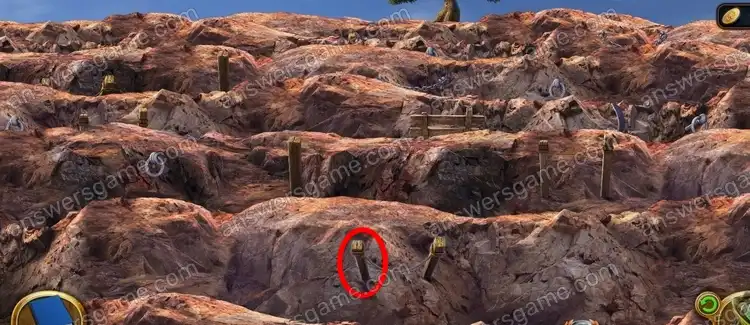

The second part of the game Lost Lands 9 - Stories of the First Brotherhood has been successfully completed. If you want to know the walkthrough of the third chapter, please go to the link First Brotherhood.