
Lost Lands 9 Chapter First Brotherhood Walkthrough
This is a walkthrough for the third chapter of Lost Lands 9: First Brotherhood. Now you have to play as both characters, using the experience you have gained in the previous chapters. Cassandra continues to give Maaron various practical tasks in the interest of the Academy, in which he will have to test his knowledge in practice. Folnur begins to regret not going to school. The friends join forces to find and capture the entity, but each of them pursues a different goal.
- Chapter 1: Unchildlike mischief
- Chapter 2: Academic interest
- Chapter 3: First Brotherhood
Here is the complete walkthrough of chapter 3 with detailed step-by-step guides for each location. In this guide you will learn how to solve the puzzles in the third part of Lost Lands 9 and where are the items you need to collect to continue the game.
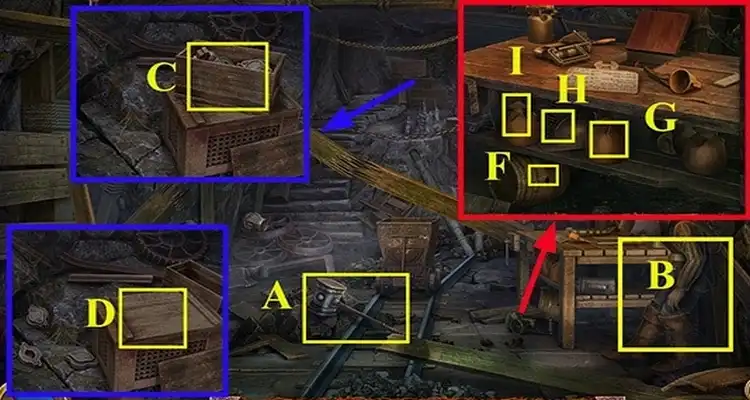
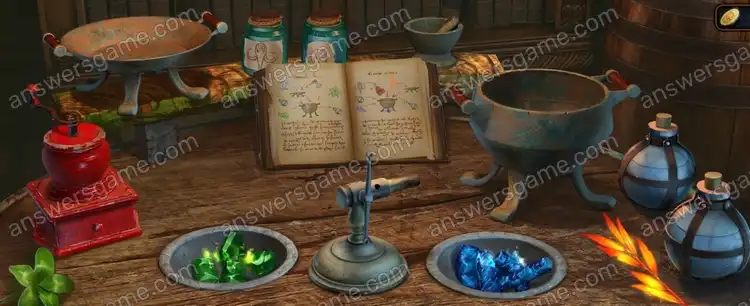
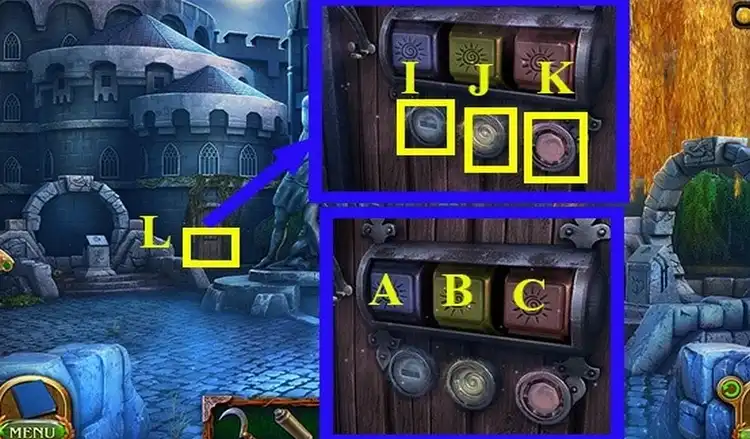
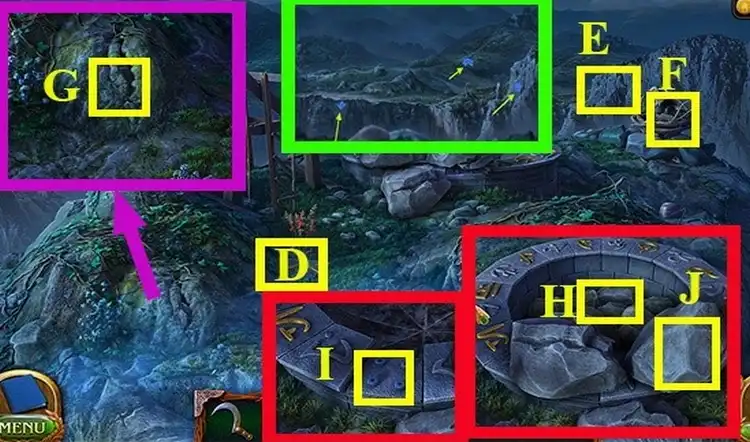
✔ Pick up FOLNUR'S HAMMER (A)
✔ Press the man (B)
✔ Press the box three times (C)
✔ Click on the bottom box and take the CORD (D)
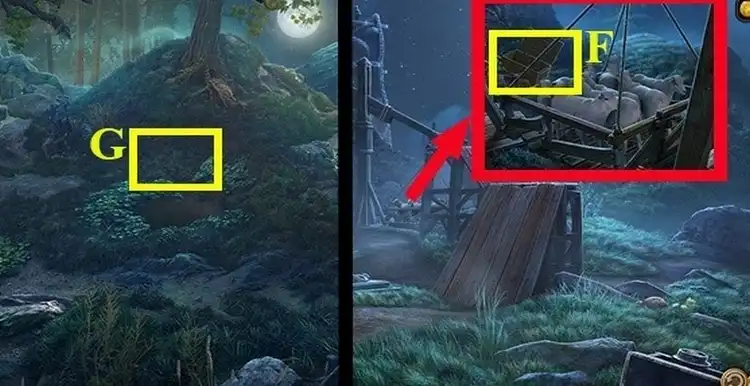
✔ Press the barrel under the table (F) and take the KEG OF GUNPOWDER
✔ Press the bag (G)
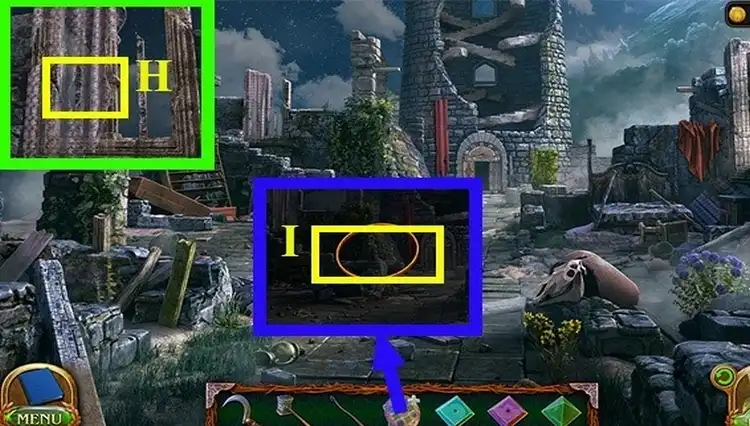
✔ Press on the helmet (H)
✔ Press the bag (I)
✔ Press the grate (I)
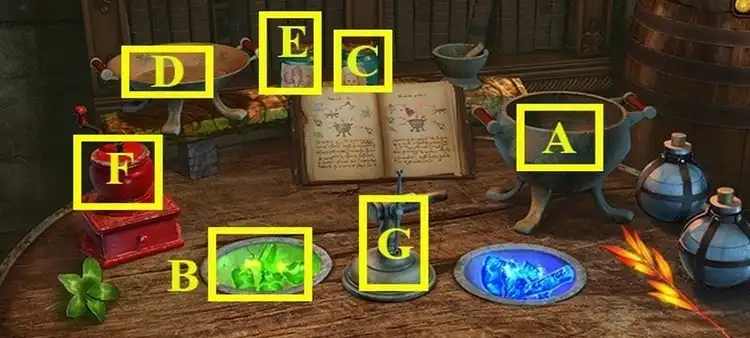
✔ Pick up the MUG
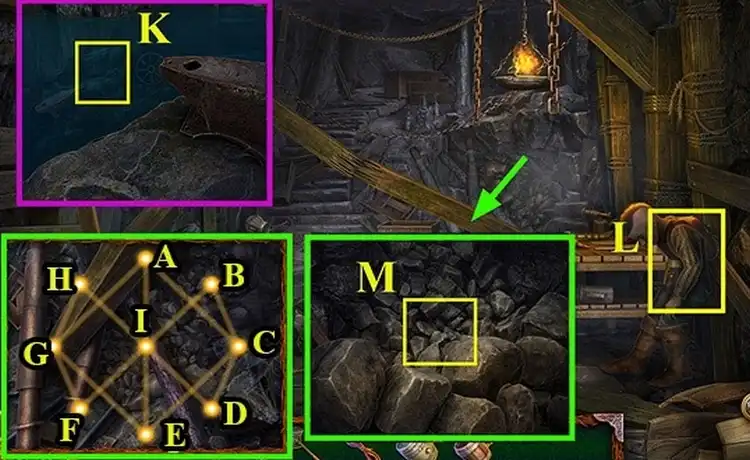
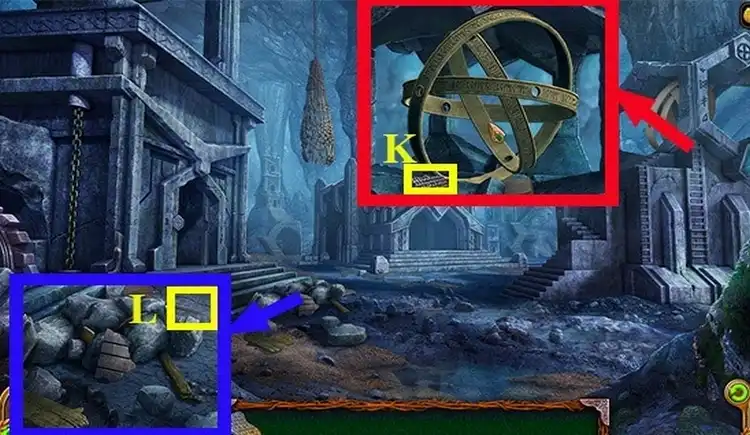
✔ Put water in the MUG (K) and get a MUG WITH WATER
✔ Give the guy a MUG WITH WATER (L)
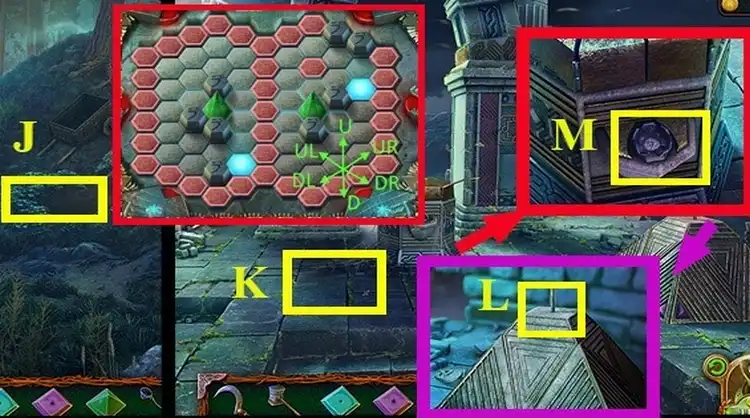
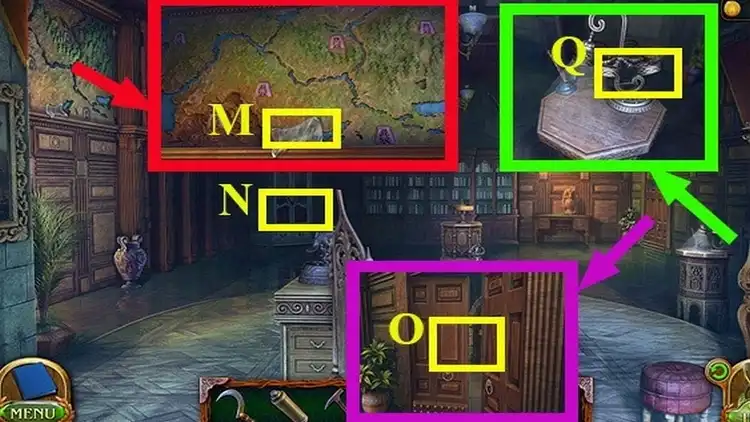
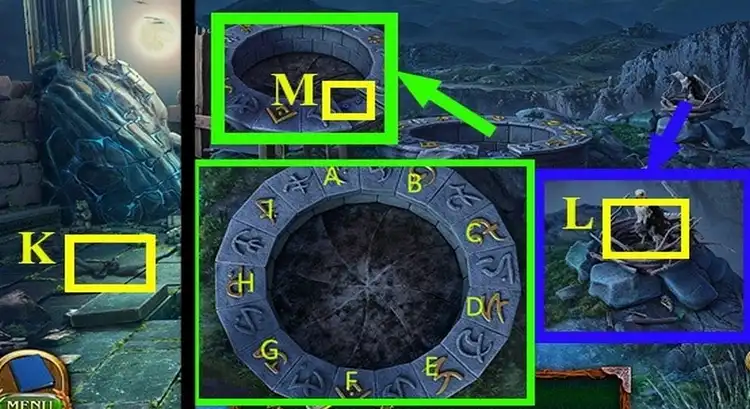
✔ Put the KEG OF GUNPOWDER on the rubble (M).
✔ Connect the CORD to the keg (M)
✔ Solve the puzzle by tracing the beam along all the lines
✔ Puzzle walkthrough:
E, I, F, G, H, I, B, C, D, I, A, C, E, G, A
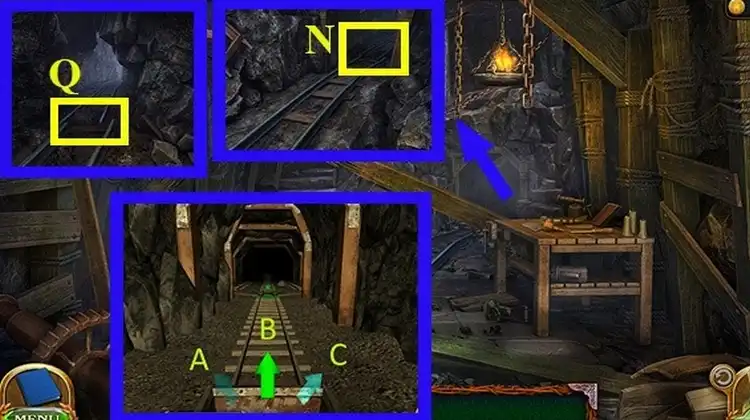
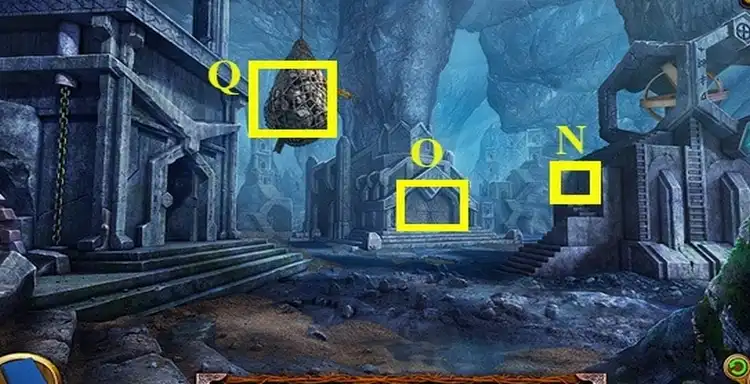
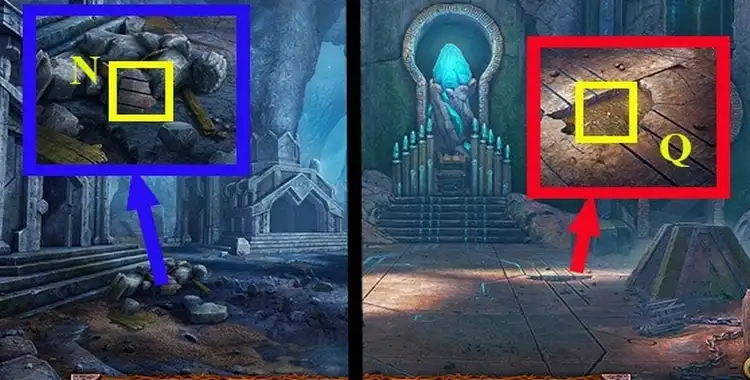
✔ Enter the tunnel (N)
✔ Use FOLNUR'S HAMMER to put the rails back in place (Q)
✔ Go forward and solve the puzzle. Get to the exit of the mine bypassing the obstacles. Press to start moving
✔ Puzzle walkthrough:
C, B, A, B, A, A, B, C, A, A, C, C
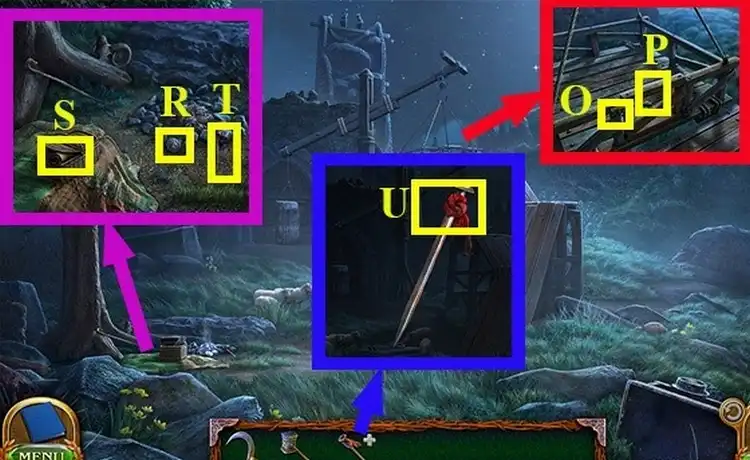
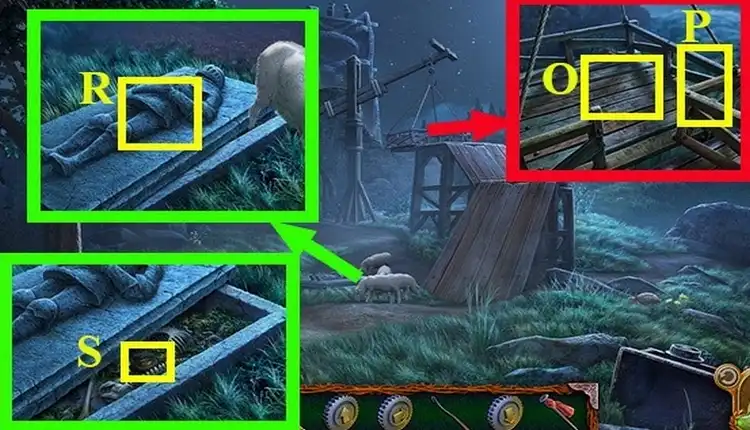
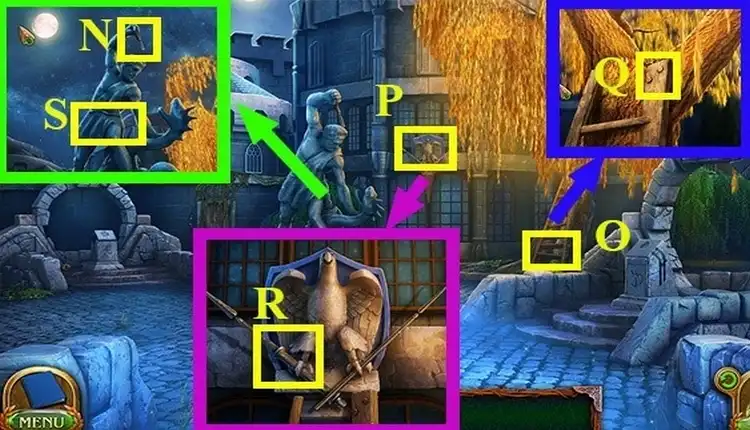
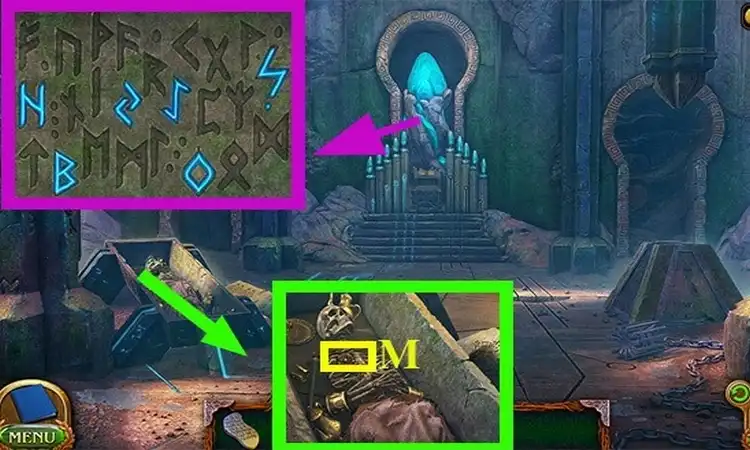
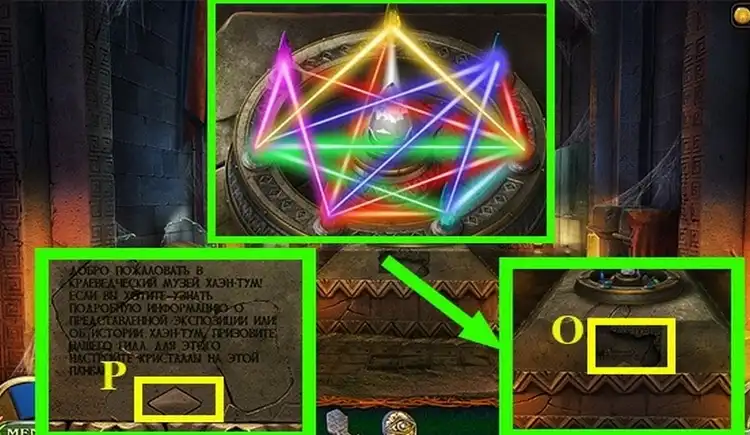
✔ Press the suspended platform (O)
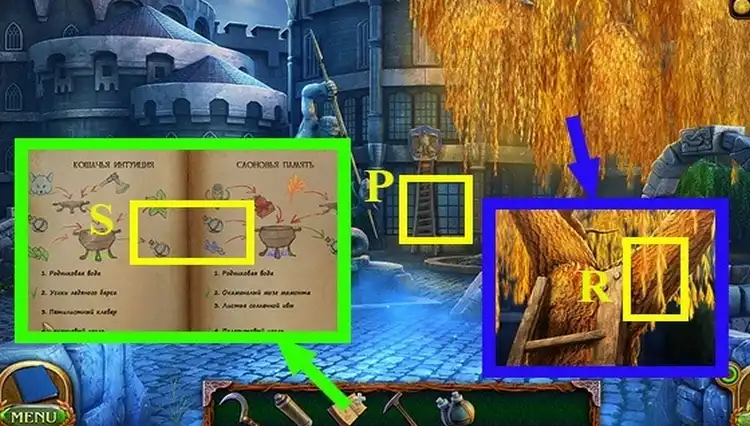
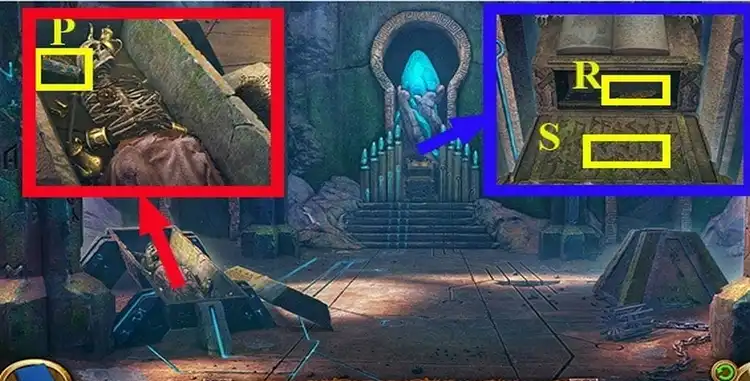
✔ Pick up the PIECE OF THE PUZZLE on the platform (P)
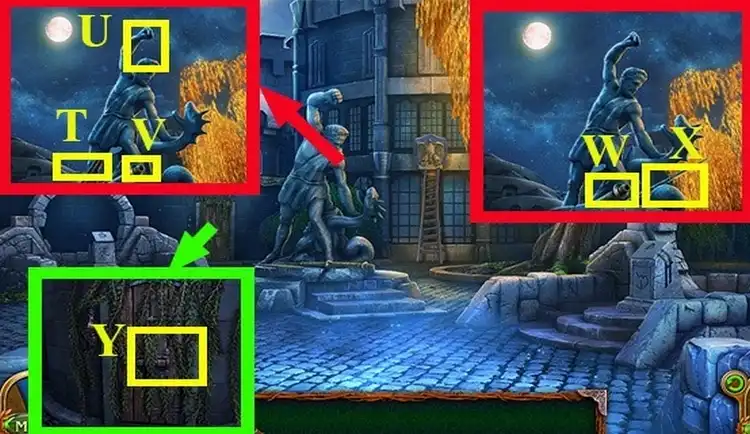
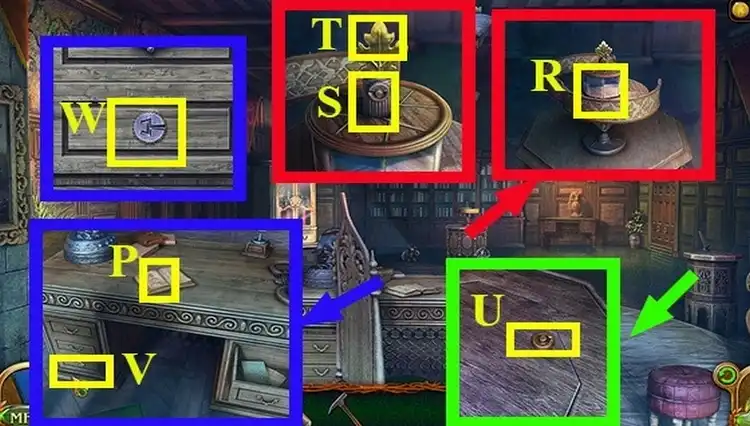
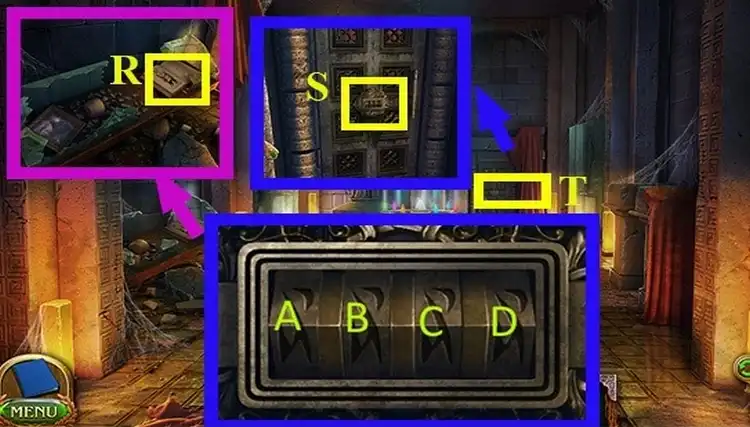
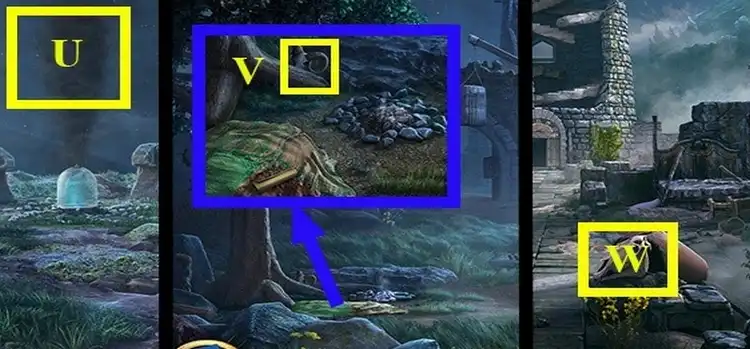
✔ Pick up the CASTLE GATE DETAIL under the tree (R)
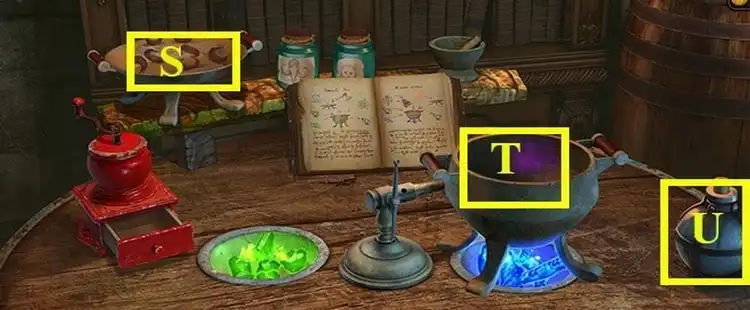
✔ Click on the bag (S) and take the SAUSAGE
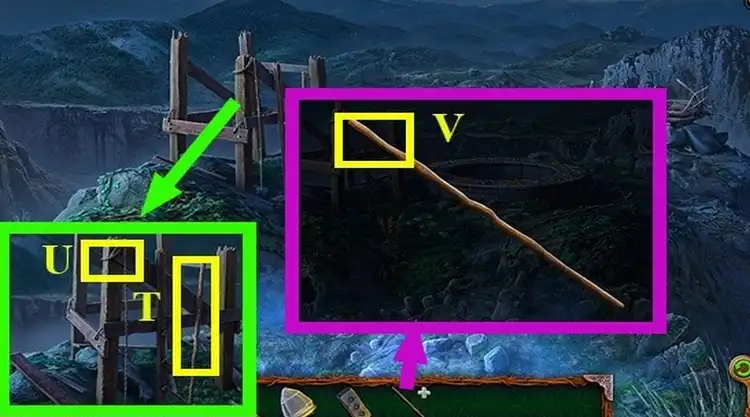
✔ Pick up the BROKEN FLAG by the fire pit (T)
✔ Click on the BROKEN FLAG, then on the rest of the cloth on it (U)
✔ Go up
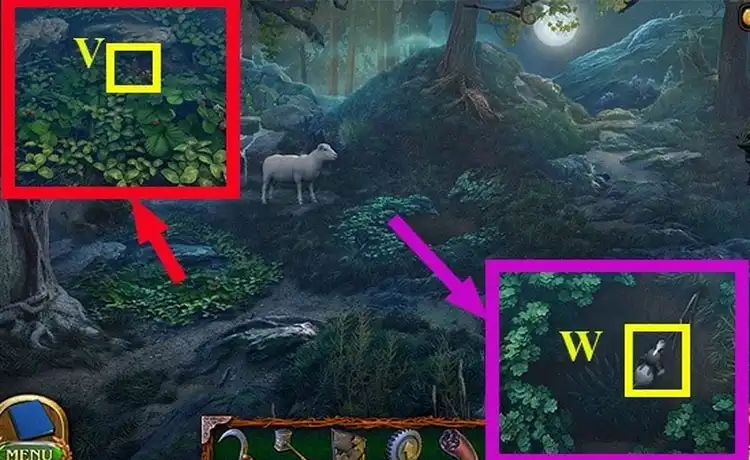
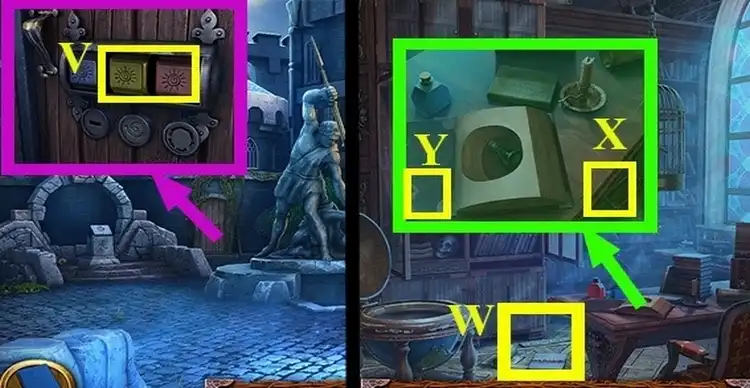
✔ Pick up the PIECE OF THE PUZZLE in the strawberry bushes on the left (V)
✔ Click on the hole, then on the dog (W)
✔ Walk forwards
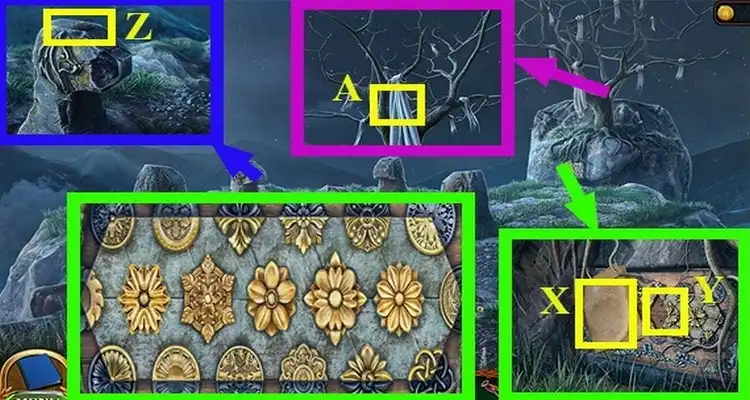
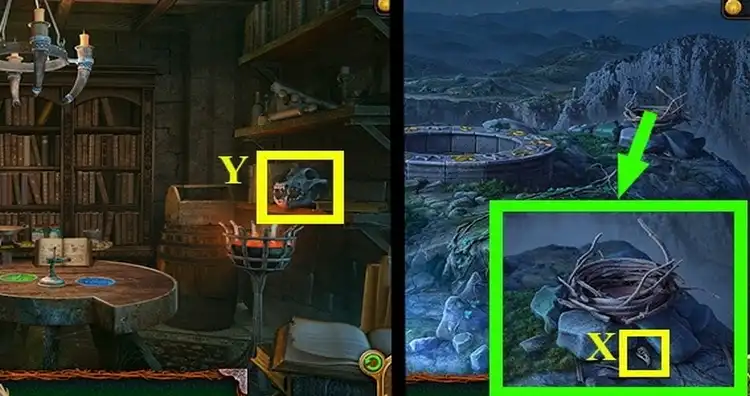
✔ Click on the puzzle stone under the tree on the right (X)
✔ Click on the manuscript (X)
✔ Install the missing PIECE OF THE PUZZLE (Y)
✔ Solve the puzzle. Re-establish the pattern by rotating the pieces
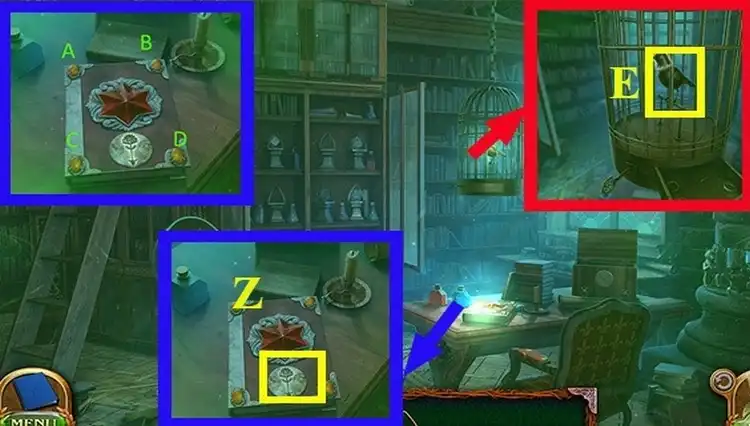
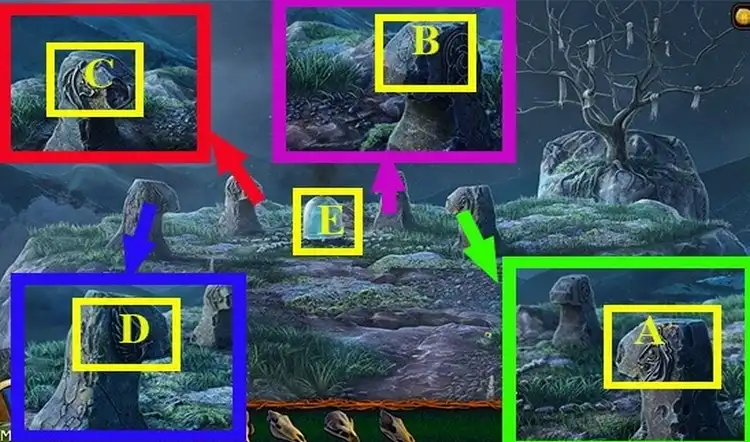
✔ Pick up the CASTLE GATE DETAIL on the second stone from the left (Z)
✔ Take the SICKLE and cut the PIECE OF CLOTH on the tree (A)

✔ Place the PIECE OF CLOTH on the BROKEN FLAG (B)
✔ Go backwards twice
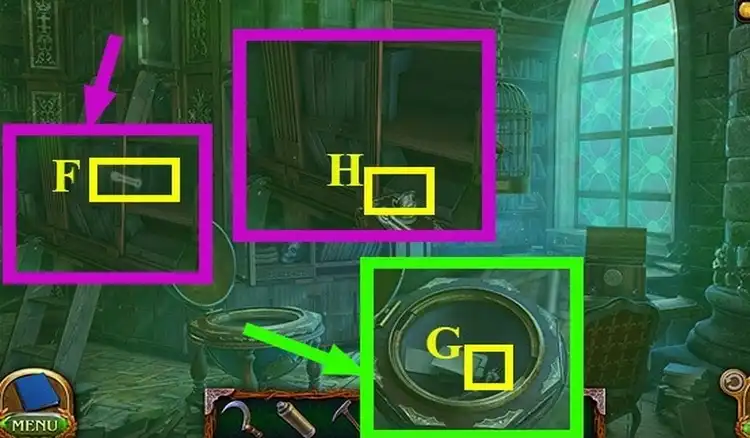
✔ Pick up SHEPHERD'S STAFF under the tree (C)
✔ Pick up the EMPTY BASKET (D) under the tree
✔ Go up

✔ Use SHEPHERD'S STAFF to help the dog out of the hole (E)
✔ Place the EMPTY BASKET in the strawberry field
✔ Collect all the berries in the basket, click on it to get the RIPE STRAWBERRIES
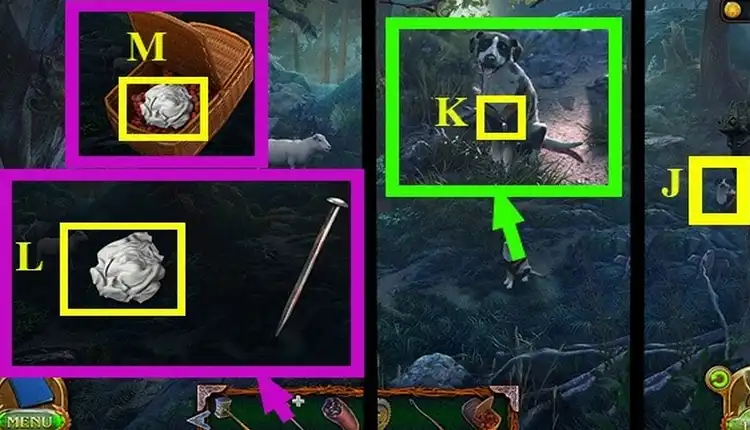
✔ Throw SAUSAGE to the dog (J)
✔ Pick up the CASTLE GATE DETAIL on the dog's collar (K)
✔ Place RIPE STRAWBERRIES on the cloth (L)
✔ Click on the bow to colour the fabric (M)
✔ Click on the coloured fabric (M) to get RED FLAG
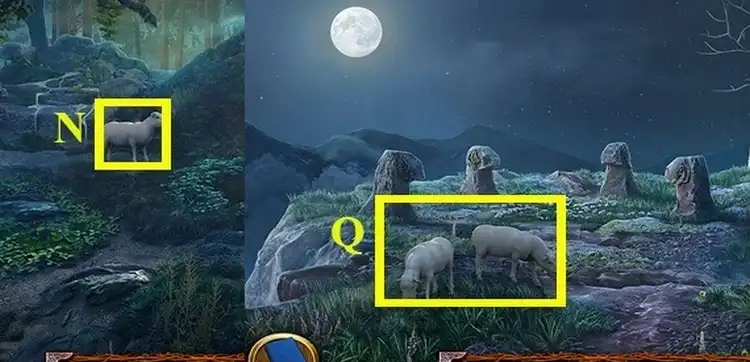
✔ Bring RED FLAG to the sheep (N)
✔ Walk forwards
✔ Bring RED FLAG to the sheeps (Q)
✔ Walk backwards twice
✔ Place the RED FLAG on the platform (O)
✔ Use FOLNUR'S HAMMER to place the flag (P)
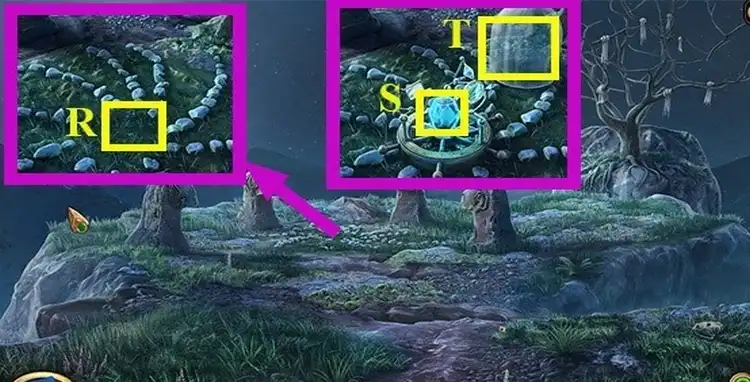
✔ Release the sheep using SHEPHERD'S STAFF (R)
✔ Take the CASTLE GATE DETAIL from the crypt (S)
✔ Go to the gate and install the CASTLE GATE DETAIL

✔ Solve the puzzle. Clear the centre of the field of copper chips
✔ Puzzle walkthrough:
RIGHT, RIGHT, TOP, TOP, LEFT, DOWN, DOWN, DOWN, RIGHT, DOWN, LEFT, LEFT, TOP, TOP, TOP, LEFT, DOWN, DOWN, DOWN, LEFT, TOP, TOP, TOP, TOP, RIGHT, RIGHT, RIGHT, RIGHT
✔ Go forward

✔ Click on the bed on the right (U)
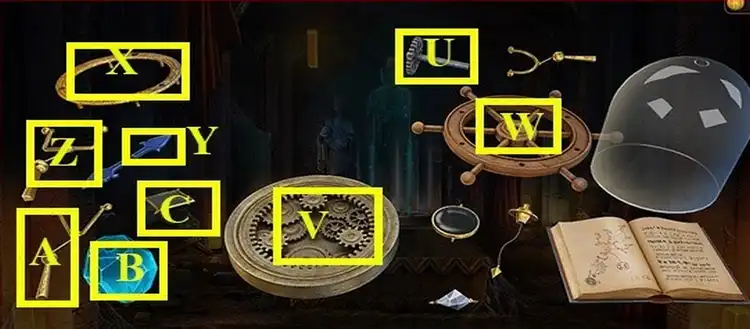
✔ Take the EMBROIDERY HOOP under the bedspread (V)
✔ Click on the window on the left (X) and take the GLASS PRISM
✔ Solve the puzzle on the door. Make a pattern according to the embroidery pattern
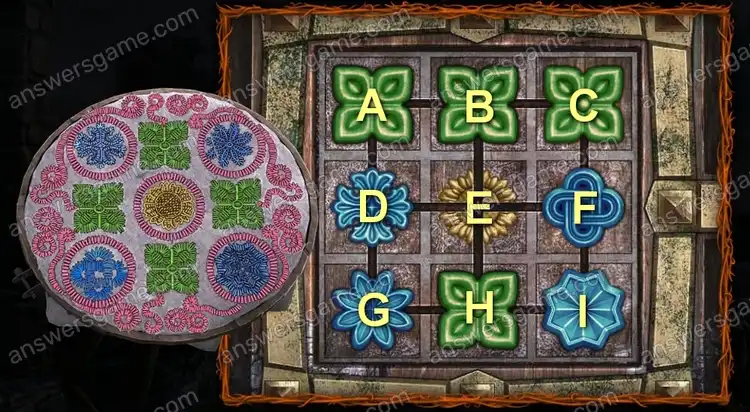
✔ Puzzle walkthrough:
D, A, B, E, D, G, H, E, D, A, B, E, F, C, B, A, D, G, H, E, D, G, H, E, D, A, B, E
✔ Go forwards and then backwards
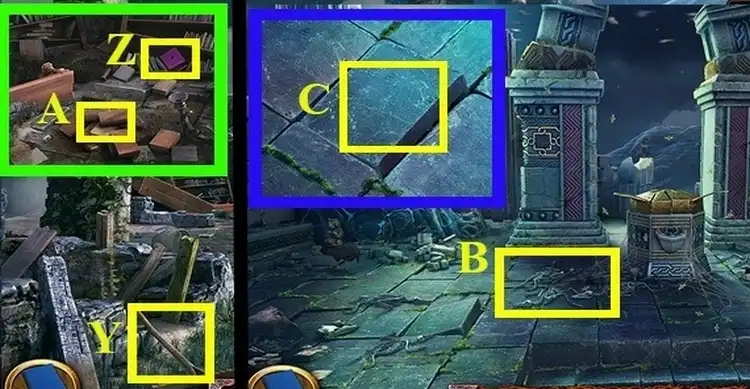
✔ Take the RAKE (Y) from the left side
✔ In the destroyed cupboard, take GLASS PRISM (Z)
✔ Click on the pile of books (A)
✔ Walk forwards
✔ Use RAKE and remove the bird skeletons (B)
✔ Pick up the protruding tile and take the GLASS PYRAMID (C)
✔ Go backwards twice, then to the right
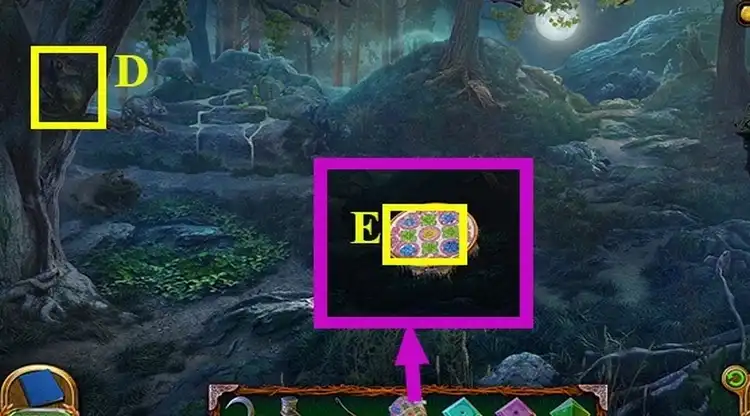
✔ Click on the tree on the left (D)
✔ Select EMBROIDERY HOOP and click on it (E)
✔ Walk backwards
✔ Click on the sheeps and take the CART ON WHEELS (F) behind them
✔ Go upwards
✔ Place the CART ON WHEELS on the hill in the centre (G)
✔ Go backwards, then through the gate
✔ Use the SICKLE to cut the curtain on the window (H) and get the LACE CURTAIN
✔ Place LACE CURTAIN on the hoop (I).
✔ Use the SICKLE to trim off the excess (I)
✔ Attach SHEPHERD'S STAFF to the hoop (I) to make a NET
✔ Go backwards, then upwards
✔ Put the NET on the trolley (J)
✔ Find all the chameleons
✔ Get the BOX OF CHAMELEONS
✔ Go backwards, then go forwards 2 times
✔ Use the BOX OF CHAMELEONS to remove the flies (K)
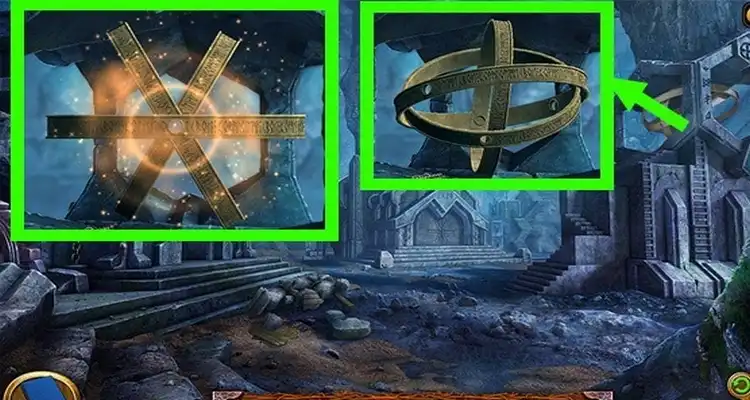
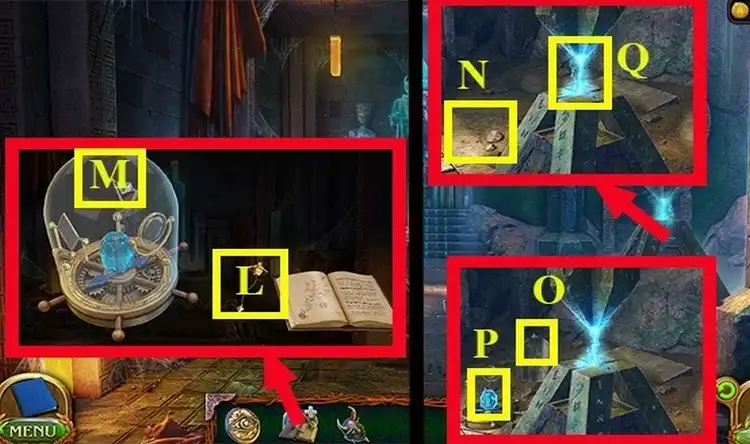
✔ Put GLASS PRISMS and GLASS PYRAMID on the pin at the pyramid on the right (L)
✔ Take RUNESTONE
✔ Put RUNESTONE in the panel (M)
✔ Solve the puzzle. Place the pyramids on the blue spaces at the same time
✔ Puzzle walkthrough:
DR, D, DL, UL, U, U, U, U, UR, DR, D, DR
✔ Go straight ahead
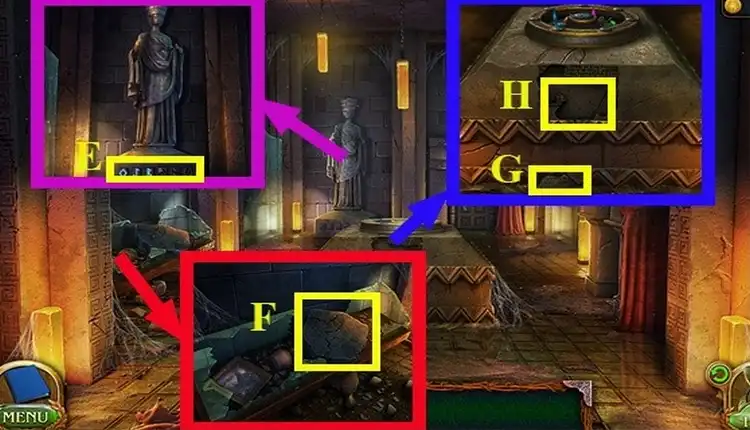
✔ The statue has a CHISEL in its hand, take it (N)
✔ Tap on the tree and use the CHISEL to tear off the ladder (Q)
✔ Tap FOLNUR'S HAMMER on the CHISEL (Q)
✔ Drag the ladder (O) to the coat of arms (P)
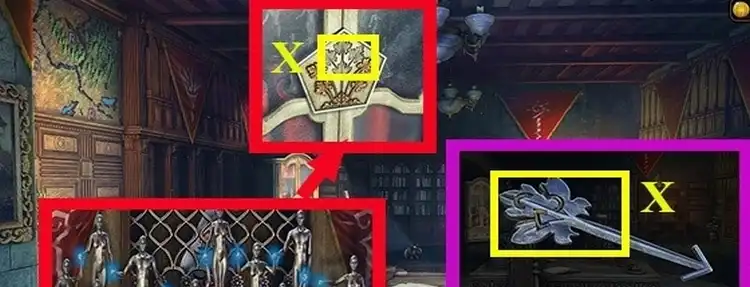
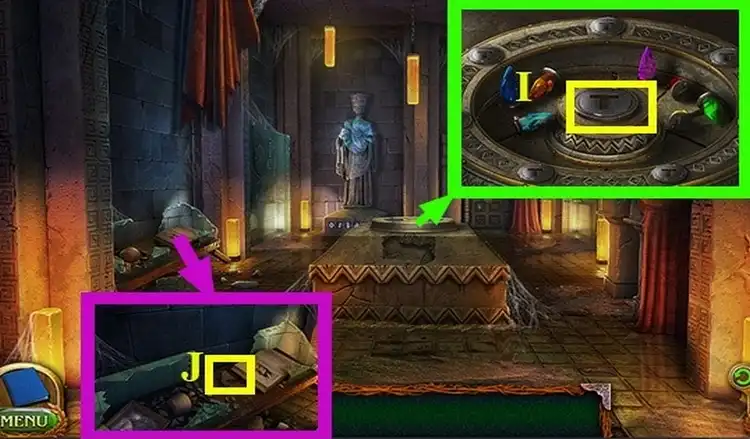
✔ Take SPEARS from the bird on the coat of arms (R)
✔ Try giving SPEARS to the warrior on the statue (S)
✔ Assemble the spear from two parts. Drag (W) to (X)
✔ Click on the overgrown door (Y)
✔ Descend into the passage opened under the statue
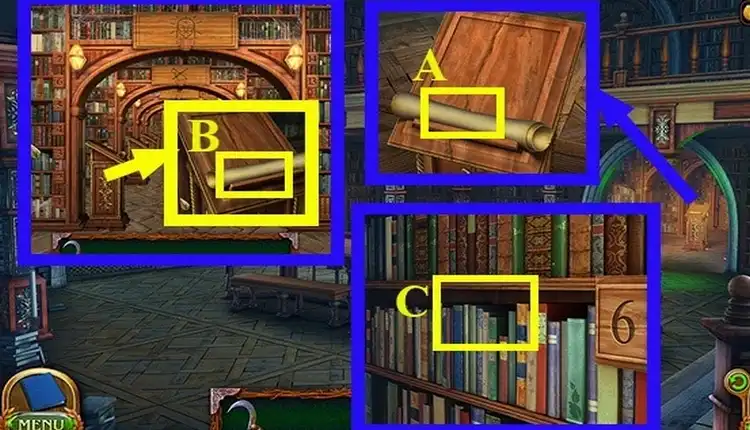
✔ Click on the roll to find out which section of the library you need to go to (A)
✔ Walk down the corridor to the correct section, then click on the roll to find out the shelf number (B)
✔ Click on the books (C)
✔ Go through the left door
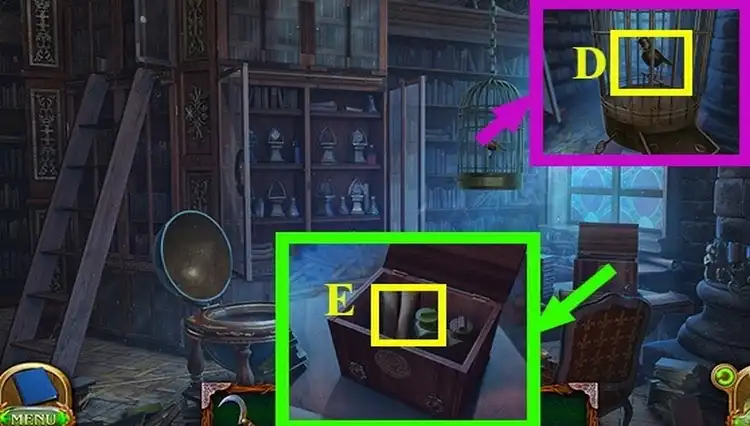
✔ Press on the bird cage (D)
✔ Click on the box on the table (E) and take the SPOTTING SCOPE
✔ Walk backwards
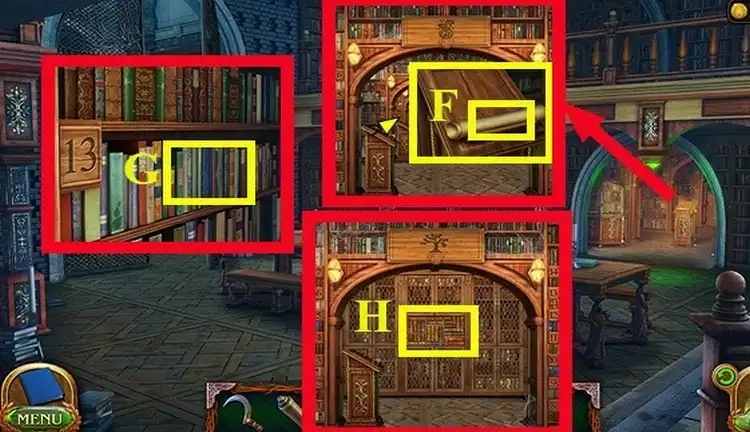
✔ Press the roll (F)
✔ Go to the alchemy section and click on the roll with the shelf numbers on it
✔ Select the required books (G) and get the BOOK OF POTIONS
✔ Go to the end of the corridor and click on the door (H)
✔ Solve the puzzle. Arrange the books to restore the patterns on the spines of the books
✔ Book puzzle walkthrough:
Arrange the books according to the picture
✔ Go through the door that opens
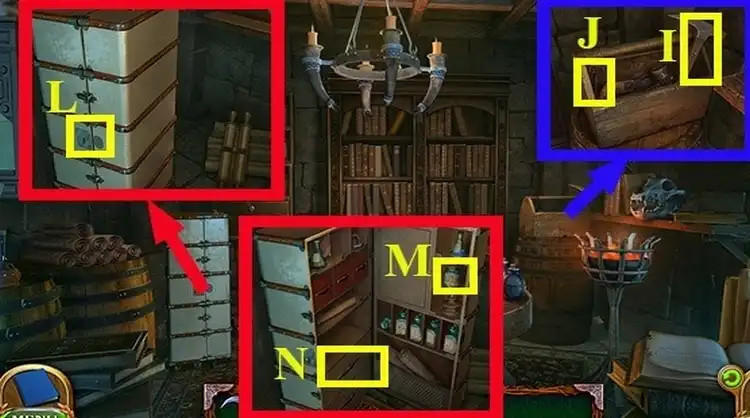
✔ Take the MINI PICKAXE from the toolbox (I)
✔ Take the CABINET KEY (J) from the same place
✔ Open the cupboard in the left corner using the CABINET KEY (L)
✔ Take the FOSSILIZED MAMMOTH'S BRAIN (M) and ICE LEOPARD'S WHISKERS (N) from the cupboard

✔ On the table, take the EMPTY BOTTLES (Q)
✔ Open the book and put FOSSILIZED MAMMOTH'S BRAIN and ICE LEOPARD'S WHISKERS (O) on it
✔ Go back 3 positions
✔ Move the ladder back to the tree (P)
✔ Pick up SUNNY WILLOW LEAVES (R)
✔ Open the book and put the SUNNY WILLOW LEAVES (S) on it
✔ Go back
✔ Use MINI PICKAXE on the palerite vein (T) to get PALERITE CRYSTALS
✔ Go backwards 2 times, then upwards
✔ Pour water from the stream into the EMPTY BOTTLES (U) to get SPRING WATER
✔ Use the MINI PICKAXE on the vecone wire (V) to get VECONIUM CRYSTALS
✔ Pick up the FIVE LEAF CLOVER (W) under the tree
✔ Open the book and put in the book:
- SPRING WATER
- PALERITE CRYSTALS
- VECONIUM CRYSTALS
- FIVE LEAF CLOVER
✔ Get SET OF INGREDIENTS
✔ Go backwards, then forwards 3 times, then down, right and forwards 7 times
✔ Place the SET OF INGREDIENTS on the table
✔ Solve the puzzle. Reconstruct the correct pattern
✔ Puzzle solution:
There is no permanent solution, as the lines are placed in random order by each player. The pattern according to which the lines should be placed can be seen in the puzzle itself
✔ Put the cauldron (A) on a green fire (B)
✔ Put CAT'S INTUITION (C) in the frying pan (D)
✔ Put ELEPHANT'S MEMORY (E) in the red chopper (F)
✔ Drag the burner (G) onto the frying pan (D)
✔ Pour SPRING WATER (H) into the cauldron (I)
✔ Put the contents of the frying pan (J) into the cauldron (I)
✔ Put the FIVE LEAF CLOVER (K) into the cauldron (I)
✔ Pour the potion from the cauldron (I) into the empty bottle (H) and get CAT'S INTUITION POTION
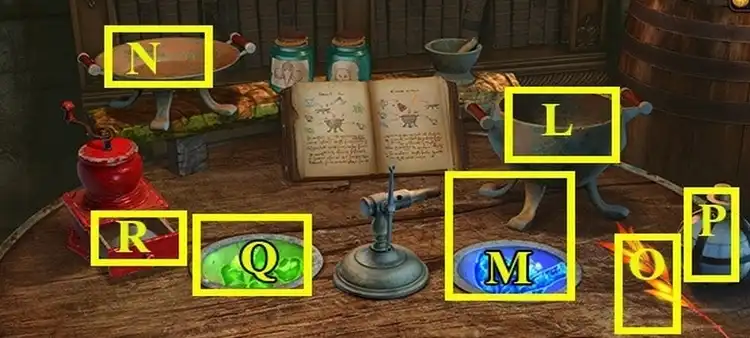
✔ Put the cauldron on a blue fire (M)
✔ Put the frying pan (N) on a green fire (Q)
✔ Put SUNNY WILLOW LEAVES (O) in the frying pan (Q)
✔ Pour SPRING WATER (P) into the cauldron (M)
✔ Pour the contents of the chopper (R) into the cauldron (M)
✔ Take the pan off the fire
✔ Put the contents of the pan (S) into the cauldron (T)
✔ Pour the potion from the cauldron (T) into the empty bottle (U) and get ELEPHANT'S MEMORY POTION
✔ Go back 3 times
✔ Click on the door (V) and use ELEPHANT'S MEMORY POTION
✔ Go downstairs, then left
✔ Click on the floor (W) and use CAT'S INTUITION POTION
✔ Under the table, take FRETSAW (X)
✔ Close the book (Y)
✔ Press the key on the book (Z)
✔ Solve the puzzle. Click on the stones in the corners of the book, repeating the sequence of lighting them up
✔ Puzzle walkthrough:
D, B, B, D, A, C, C, D
✔ Get CASSANDRA'S SECRET KEY
✔ Click on the bird cage (E) and use FRETSAW to get CASSANDRA'S SECRET KEY
✔ Click on the locker above the ladder and get the box (F)
✔ Take the PART OF THE HORSE FIGURINE (G) out of the globe
✔ Apply PART OF THE HORSE FIGURINE to the box (H) and take CASSANDRA'S SECRET KEY
✔ Go back 2 times
✔ Insert 3 CASSANDRA'S SECRET KEYS into the lock on the door (L)
✔ Solve the puzzle. Enter the correct code
✔ Puzzle walkthrough:
A, A, A, A, B, B, B, B, B, C
✔ Go into the room and find the items
✔ Puzzle walkthrough for finding objects:
- Pick up the CROSSBOW LIMB on the table
- Lift up the rug on the wall on the left
- Use the CROSSBOW LIMB to pick up the protruding brick
- Take the sword and use it to remove the CHIP from the chandelier
- Take the OILER on the chest of drawers
- Use the OILER to grease the deadbolt and open the desk drawer
- Take the PINCERS and BROOM from the desk drawer
- Use BROOM to remove the cobwebs from the hiding place in the wall
- Take the SPIDER FIGURINE and CROWN from the stash
- Put CROWN on the box on the table and take CHIP
- Put the SPIDER FIGURINE in the slot on the chest of drawers
- Install CHIPS and solve the puzzle
- Take the CORKSCREW
- Use CORKSCREW to open the bottle on the table and take PICKLOCK
- Use the PINCERS and PICKLOCK to open the door on the right
✔ Walk through the open door
✔ Press the tracing paper (M)
✔ Press on the door (N)
✔ Pick up the LAMP (Q) on the table on the right-hand side
✔ Use the LAMP to light up the pattern on the door (N)
✔ Press the door on the right (O)
✔ Press the book on the table (P)
✔ Press the book (P) again and take the PATTERN ELEMENT
✔ Click on the projector (R)
✔ Use the PATTERN ELEMENT to remove the PATTERN ELEMENT from the projector (S)
✔ Use the PATTERN ELEMENT to open the stash in the table on the right (U) and take another PATTERN ELEMENT
✔ Use the PATTERN ELEMENT on the desk drawer (W) and take another PATTERN ELEMENT
✔ Select the grey PATTERN ELEMENT (X) and insert all other PATTERN ELEMENTs into it
✔ Get a new PATTERN ELEMENT
✔ Place the PATTERN ELEMENT on the pattern on the door (Y).
✔ Solve the puzzle. Rearrange the figures so that they are all holding hands
✔ Puzzle walkthrough:
See the picture for the correct positioning of the pieces
✔ Take RUNE HYPERSTONE
✔ Place RUNE HYPERSTONE on the tracing paper (Z)
✔ Pick up the QUILL on the table (A)
✔ Place the QUILL on the tracing paper (Z)
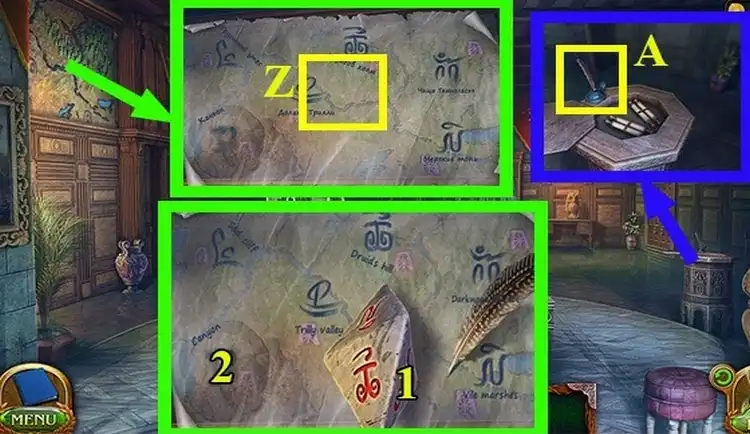
✔ Solve the puzzle. Find the symbol on the stone that is not on the map
✔ Puzzle walkthrough: 1, 1, 2
✔ Go backwards, then down and to the left
✔ Take RUNESTONE (A) from the cupboard
✔ Go back 2 times
✔ Put RUNESTONE in the portal on the right (B)
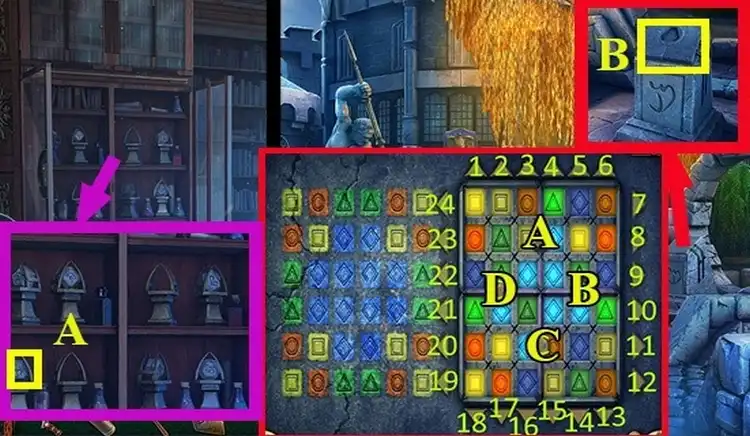
✔ Solve the puzzle. Use the buttons to move the pieces to repeat the pattern on the left
✔ Puzzle walkthrough is different for each player, as the task is randomly generated
✔ Put RUNE HYPERSTONE in the opened drawer (C)
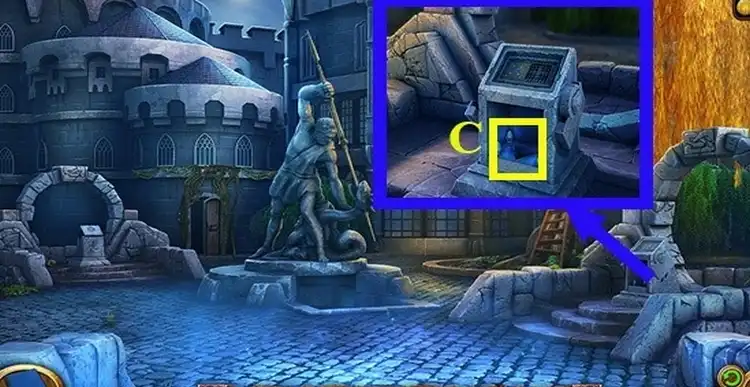
✔ Press the teleporter
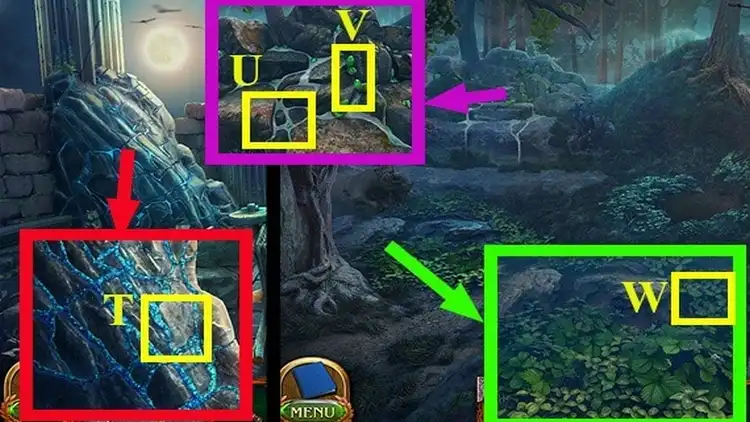
✔ Take the WELL TILE near the flower (D)
✔ Take the SPOTTING SCOPE, click on the far rock at the top right (E) and look for the symbols. There will be two symbols on the rock and one on the ground near the road
✔ Click on the vulture's nest (F)
✔ Use the MINI PICKAXE to break the crevice on the left (G) and take the PROJECTION CRYSTAL
✔ Clear the stones from the well (H)
✔ Put the WELL TILE (I)
✔ Go back 2 times
✔ Pick up DEAD CROW (K)
✔ Go forwards and then to the right
✔ Give the vulture (L) the DEAD CROW and take the WELL TILE from the nest
✔ Place the WELL TILE on the well (M)
✔ Solve the puzzle. Click on the plates with certain symbols
✔ Puzzle walkthrough: C, D, G
✔ Click on the well
✔ Press the ladder (N)
✔ Press the hanging bag (Q)
✔ Press the sign in the middle (O)
✔ Go through the door on the left
✔ Pick up the PATTERN BLOCK near the skeleton (P)
✔ Press the centre and place the pen (R) on the plate (S)
✔ Go back 2 times
✔ Pick up the LONG POLE near the remains of the wooden structure (T)
✔ Use SICKLE to cut the rope (U) and get PIECE OF ROPE
✔ Put the SICKLE on the pole (V), put the PIECE OF ROPE and get the ELONGATED SICKLE
✔ Go downstairs

✔ Use the ELONGATED SICKLE to cut the bag (W)
✔ Shovel the debris from the bag and pick up the PATTERN BLOCK
✔ Place the PATTERN BLOCK on the ladder (D)
✔ Solve the puzzle. Extend the steps so that they are equal in width
✔ The walkthrough is different for everyone. The puzzle has no permanent solution, the length of the steps is randomly generated
✔ Click on the rings and solve the puzzle. Place the rings in a certain position
✔ Align the holes on the rings
✔ Walk forwards
✔ Click on the runes under the statue (E)
✔ Click on the rubbish on the left, remove the stone and click on the book (F)
✔ Drag the rubble (G) onto the pyramid (H)
✔ Place the PROJECTION CRYSTAL on the pyramid (I)
✔ Pick up the SHARD OF TEXT by the book (J)
✔ Walk backwards
✔ Pick up the SHARD OF TEXT near the rings (K)
✔ Pick up the SHARD OF TEXT from the rubbish in the bag (L)
✔ Go to the left
✔ Pick up OIGELA'S MEDALLION (M) near the skeleton
✔ Press in the centre
✔ Solve the puzzle. Draw the certain symbols
✔ Go backwards
✔ Take the PART OF THE STONE FLOOR under the bag (N)
✔ Go through the left door and put PART OF THE STONE FLOOR on the hole in the floor (Q)
✔ Go backwards and then forwards
✔ Install the missing SHARDS OF TEXT pyramid (O)
✔ Press the button on the panel (P)
✔ Solve the puzzle. Arrange the crystals so that their rays point towards the other crystals
✔ Puzzle walkthrough:
Top yellow crystal, then, clockwise, blue, red, light green, orange, green, violet
❗ If the rays are directed correctly but the passing does not count, swap a pair of crystals, then switch back
✔ Press the book (R) twice and get BOOK ABOUT THE SOUL CATCHER
✔ Press the door (S)
✔ Solve the puzzle. Enter the correct code
✔ Puzzle walkthrough:
A, A, A, A, B, B, B, B, B, C, D, D, D
✔ Enter the room and find the items you need:
- Take the BASIS on the knight's shield
- Take the AXIAL GEAR under the table
- Take the STEERING WHEEL on the wall
- Pick up the POLE ARROW on the left wall
- Click on the armour, take the torch on the left and use it to open the visor on the helmet, then take the CRYSTAL
- Click on the globe, take the key on the bottom right, open the globe and take the SCALE
- Click on the table, remove the axe and take the LENS BRACKET
- On the left, move the swords away and take the PRISM BRACKET
- On the right, move the arrows away and take the MIRROR BRACKET
- On the spears, take the MIRROR
- On the table take FLASK
- Click on the helmet on the table and solve the puzzle. Click the following symbols: triangle, spear, square. Take the LENS
- Click on the place where the STEERING WHEEL was, then take the PRISM
- On the left above the swords, take the PENDULUM
✔ Get PARTS KIT FOR THE SOUL CATCHER
✔ Get TALKING MASK
✔ Assemble the Soul Catcher according to the instructions
✔ Drag AXIAL GEAR (U) to BASIS (V)
✔ Drag STEERING WHEEL (W) to BASIS
✔ Drag POLE ARROW (Y) to BASIS
✔ Drag CRYSTAL (B) to BASIS
✔ Drag SCALE (X) to BASIS
✔ Drag LENS BRACKET (A) to BASIS
✔ Drag PRISM BRACKET (A) to BASIS
✔ Drag MIRROR BRACKET (A) to BASIS
✔ Set MIRROR, PRISM and LENS
✔ Set FLASK and PENDULUM
✔ Get UNCHARGED SOUL CATCHER
✔ Go back and then left
✔ Place UNCHARGED SOUL CATCHER next to the mana generator (N) and remove the flask
✔ Drag the CRYSTAL (N) onto the mana generator (Q)
✔ Put the flask (O) back on (P) and take the SOUL CATCHER.
✔ Go backwards 6 times, then up and to the right
✔ Place the SOUL CATCHER on the stone figure (R) and remove the flask
✔ Put OIGELA'S MEDALLION on the crystal (S)
✔ Click on the CRYSTALS and LENSES
✔ Put the flask (T) back
✔ Place the RITUAL MASK on (U)
✔ Go back 2 times
✔ Pick up the RAM SKULL under the tree (V)
✔ Walk forwards
✔ Pick up HORSE SKULL (W)
✔ Go 2 times forwards, then go right.
✔ Pick up the EAGLE SKULL (X) near the nest
✔ Go BACK, DOWN and 8 times FORWARD
✔ Pick up the WOLF SKULL (Y) from the shelf
✔ Go backwards 5 times, then up and straight ahead
✔ Place the skulls on the stones according to the drawings on them
✔ Place the HORSE SKULL on (A)
✔ Put the RAM SKULL on (B)
✔ Put WOLF SKULL on (C)
✔ Put EAGLE SKULL on (D)
✔ Press the SOUL CATCHER (E)
✔ Solve the puzzle. Move the lines to create the right patterns

✔ Puzzle walkthrough:
1. (7, 9) ➜ 1, (9, 19) ➜ 25, (9, 25) ➜ 10, (9, 10) ➜ 4, (17, 7) ➜ 13, (17, 13) ➜ 16
2. (9, 19) ➜ 10, (9, 10) ➜ 5, (17, 7) ➜ 12, (12, 7) ➜ 11, (17, 12) ➜ 21, (19, 17) ➜ 18, (19, 18) ➜ 25
3. (7, 9) ➜ 8, (8, 9) ➜ 4, (4, 9) ➜ 10, (10, 9) ➜ 20, (7, 8) ➜ 2, (7, 2) ➜ 6, (7, 6) ➜ 16, (17, 7) ➜ 13, (9, 19) ➜ 13, (17, 13) ➜ 12, (13, 19) ➜ 14, (19, 17) ➜ 23
4. (7, 9) ➜ 3, (7, 3) ➜ 2, (17, 7) ➜ 13, (9, 19) ➜ 13, (9, 13) ➜ 8, (17, 13) ➜ 12, (19, 17) ➜ 23, (19, 23) ➜ 18
👋 The game has been successfully completed!